
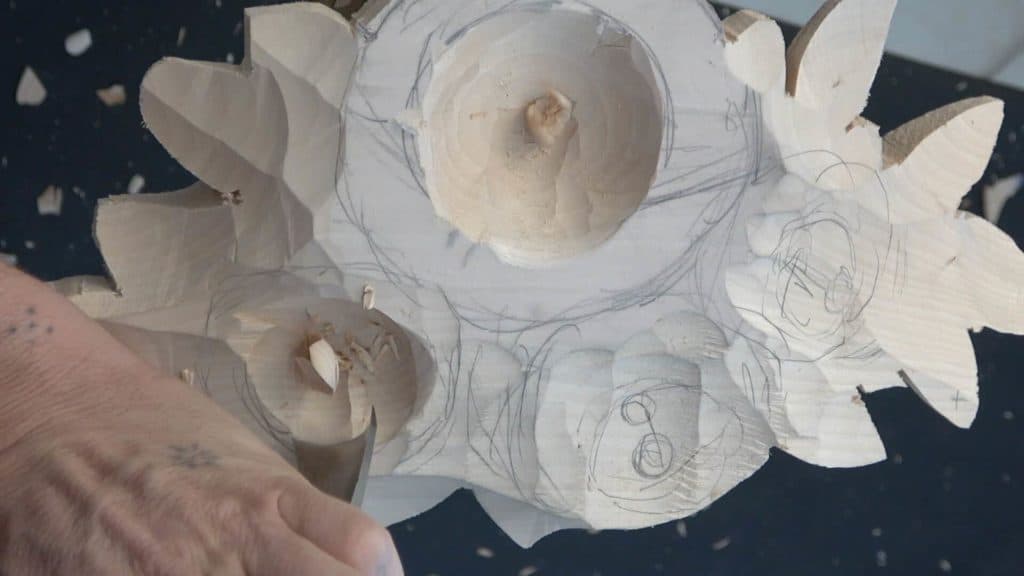
Alexander Grabovetskiy, woodcarver, School of Woodcarving · Published 2018
Do you need a special gouge to hollow out a carved flower?
Quick answer: Hollowing a carved flower is done with gouges most carvers already own. A deep 8 sweep at one inch takes the waste, a 7 at two inches cleans the walls, and the bowl comes out the way a spoon does. Roundness does not matter, since the part that fills it will not be round either.
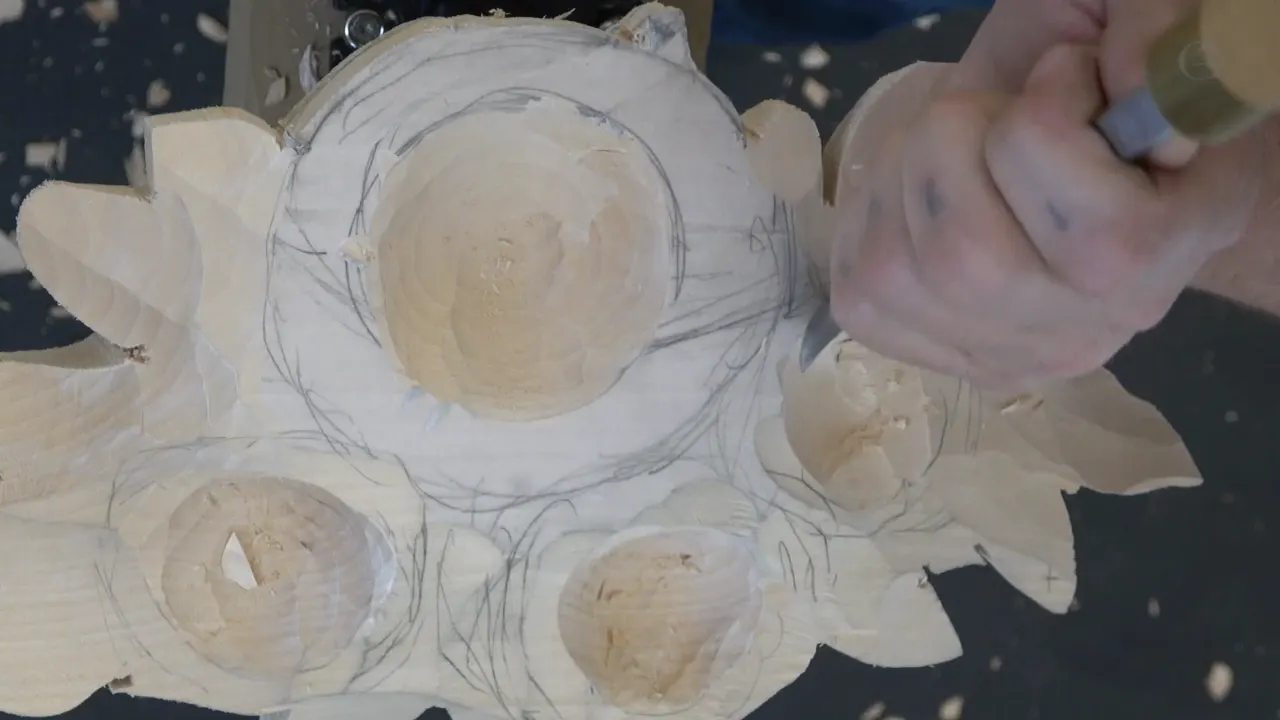
An 8 sweep one inch wide and a 7 at two inches will hollow every flower on this panel. I own a gouge ground for nothing but this job, custom made for me, and all I did with it was hold it up to the camera and put it back down. Most of you do not have one. You will not need one either.
Ever carved a flower that stayed flat however long you fussed at the petals? Did the middle sit level with the rim instead of falling away from you? Every flower is a bowl before it is anything else. Every petal you shape later has to rise out of that one hollow, and when the hollow is missing there is nothing for them to rise from.
Lesson 28 of the Hashemi flowers panel puts the second layer on the bench for the first time. Four flowers, one large and three small, and every one of them wants a bowl dug into it before a petal gets touched. I will show you which gouges do that. Depth matters more than shape here, and a lumpy bowl beats a tidy one for a reason I will get to.
What the hollow has to do
- Carry the real shape of a flower, which drops in the middle and lifts at the rim.
- Give the fixing a home. A dowel comes up through the floor of it.
- Take a small sphere of wood, carved on its own, that becomes the middle of the flower.
- Stop above the back of the board. A quarter inch, 6 mm, was all the stock left in one spot.
- Look handmade. The piece that fills it will not be a perfect ball either.
Why does a carved flower need a hollow in the middle?
Flowers fall away at their centre. Look hard at a rose or a lily and you will see the outer ring of petals bending backwards and down, away from you, with only the rings inside it turning up again. Carving that shape means digging the middle out rather than building it up, and the digging is exactly the part beginners leave out.

A second reason belongs to this panel alone. The hollow is where the fixing hides, and I laid out that whole arrangement in lesson 27. A dowel runs up through the floor of the bowl into the flower above, and a separately carved centre caps the whole thing so nobody ever meets it.
Glue fails. A few years or a hundred, it hardly matters which, because one day that joint lets go while the carving around it is still perfectly sound, and a flower drops off a panel that cost somebody a year of work. A peg of wood does not care how old the glue is. So I dig.

Which gouges take the waste out?
Deep sweeps, and bigger than feels safe. The 8 at one inch, 25 mm, did most of the work on these flowers, and a 9 will do the same job. For the heavy removal at the start I picked up a 7 that runs a shade over three inches, close to 80 mm, and that tool moves more wood in a minute than a small gouge moves in ten.
| Stage | Gouge and width | What it does on this panel |
|---|---|---|
| Roughing out | a 7 sweep, three inches or 80 mm | lifts heavy waste between the flowers fast |
| Digging the bowl | deep 8, one inch or 25 mm | works once the flower has a rim to dig inside of |
| Tight corners | narrow 9, five eighths or 16 mm | reaches lower than either of the others |
| Cleaning the walls | second 7, two inches or 50 mm | shaves standing ridges away |

The 7 I picked up for this was an Ashley Iles, and I name it on camera because students ask. Brand matters far less than sweep. A gouge numbered 8 or 9 curves enough to leave a proper bowl behind it, and a shallow 3 or 5 will only ever give you a saucer.
Even with a tool that wide I am still slicing. Pushing straight in crushes the fibres and leaves a bruised surface no amount of later work quite repairs. Skew the handle a little, let the edge travel sideways as it goes forward, and the same gouge peels instead of bruising. Grain will punish a straight push every single time, and forgive a slice.

Do you actually need the tool that was ground for this one job?
Honest answer, and it costs me nothing to give. Somewhere on my rack sits a gouge ground for this exact job and nothing else, custom made for me, and it will hollow a flower faster and cleaner than anything else I own. I showed it and set it aside. Most of you do not have one, and nobody buys a special tool for four flowers.

Specialty tools are how carvers get talked out of starting. A student watches a video, sees a shape he cannot buy, and decides the work is closed to him. Wrong. Every bowl in this lesson came out with two ordinary gouges any carver reading this could already have lying in a drawer.
Spend the money on wood.
There is a point where a purpose ground tool earns its keep, and it arrives later than people think. Fifty flowers, not four. Grinling Gibbons and his shop turned out more carved foliage than any of us will see in a lifetime, and you can stand in front of it at the V and A and count the ordinary sweeps in it.

What holds the blank while you dig?
Mine sits on a Veritas vise with a flat plate screwed to its post, and the screws go into the rear of the board where no carving will ever happen. Handy for almost any job, that plate. The blank can spin to meet the tool instead of my shoulder twisting to meet the blank.

Stable enough is the honest word for it. Not rock solid. A panel this shape, sawn out around every petal, will always flex a little somewhere, and you learn to read which direction it wants to give and push the other way. Thin fretted work needs a different answer altogether, which I went through in lesson 15.
The bench top under all this is pocked with dog holes, and chips had settled down into several of them. Nothing turns on that. It is simply what a bench looks like once the work is going.

What do the pencil marks on each flower mean?
Each one gets a circle and a slash, and the slash says which way that flower faces. Lean a flower to the left and its deep side lands on the left, so that is where the gouge attacks first and hardest. Marking it beats remembering it, because four flowers on one board will happily all end up facing the camera if nobody writes it down.

Facing is a design decision, not a carving one. It gets settled on paper, and I work through how in the design course. A flower turned the wrong way spoils a composition in a manner no amount of fine relief work will rescue afterwards.

Redraw the marks as they vanish. Every pass with a wide gouge takes some of the pencil away with it, and by the middle of an afternoon a board can be bare of everything you decided that morning. Halfway through this one I had the pencil out again over wood already roughed.

Does the bowl have to be round?
Roundness is the last thing worth worrying about. The piece going into this hollow is a sphere I carve by hand from a scrap, and a hand carved sphere is never a true ball, so a machined socket would only fight it. Loose and lumpy takes glue better than tight and perfect.
Cleaning it is a separate matter. Ridges left standing inside a bowl hold dust, catch light in ways the design never asked for, and make the fit harder to read when the sphere drops in. Clean is not the same as round. Clean means no ragged fibre and no torn end grain, which I worked through in lesson 23.

Perfection in a carving usually means a machine was involved. Nowhere in nature will you find a true circle. Basswood, the lime used all through these panel courses, grows in rings that wander, and a carving sits happier when it wanders too.

How do you know when to stop digging?
Run your thumb across the underside. The underside of this blank was already hollowed so it would lie down flat on the first layer, which means the stock between my gouge and open air was thin in places I could not see from where I stood. One spot measured about a quarter inch, 6 mm.

Screws are the other thing down there. The blank was held from behind while I worked, and a gouge that meets a screw loses. Ruined edge, ruined afternoon. I kept the positions in my head and stayed clear of them, which is easy once you have done it and hard the first time.
Stop early rather than late. Wood comes off in seconds and goes back on never, and a bowl slightly too shallow can be deepened tomorrow morning in about two minutes. Alexander, you are being timid, somebody will say. Fine by me. Deepening a shallow bowl tomorrow morning costs about two minutes, and the other way round costs a patch nobody should have to glue in.

Why do the leaves come down before the flowers?
Levels get settled before anything gets shaped. The three small flowers sit lower than the big one, the leaves around them lower still, and all of that went in with the wide gouge in the first ten minutes rather than turning up as a surprise halfway through the petals. One leaf had already reached the edge of the board and could not drop any further. A different one, I decided on the spot, could grow upward instead.

A carving where everything sits at one height reads as a pattern stamped into a board, and I showed exactly what that looks like back in lesson 2. Height is what makes shadow, and shadow is what people see from across a room. The old shops knew that before anyone wrote it down.
Position is looser than people expect. Whether a flower lands a few millimetres left or right of the drawing changes nothing anybody will notice. Whether it sits above or below its neighbour changes the whole panel.
Get the heights right and forgive yourself the rest.
Under all of this sits the first layer, the pierced lattice and its acanthus, finished earlier in the course. Its surface is anything but flat, which is why this board had to be hollowed underneath to clear it. I carved that lattice in lesson 26 and worked its underside in lesson 4.

What does a spoon have to do with a flower?
Same hollow, same movement, a different name on it. Anyone who has carved a spoon knows this in their hands already. The gouge enters at the rim, travels toward the middle, and lifts out before it ever reaches the far wall. Long bend and short bend tools both do this work. I put the two of them side by side in lesson 20.
Across the grain first, along it second. Running along the grain inside a hollow is how you find a split waiting, and a split in the floor of a socket is a repair nobody sees but everybody feels when the flower afterwards sits crooked.
Small flowers want the smaller gouge from the very start. I moved down to the one inch tool for all three of them and never went back to the wide one, because a three inch sweep inside a two inch flower simply cannot reach the floor without eating the walls on its way.
Where this leaves the panel
Four hollows, none of them round, all of them deep enough. Next comes the shape, and every flower gets its first ring turned into something you would recognise, which is lesson 29. Nothing on the bench looks like a flower yet. Normal at this stage, and it bothers students more than it should.

Forty years at this bench and the moment a flat board stops being flat still gets me. You feel it on the second layer more than the first, because the shadows suddenly have somewhere to fall. Two gouges did that. Not the special one.
The whole panel runs 49 lessons, bare board to finished carving, every mistake I made left in, and it waits behind tuition at the school.
How it's done
- Set the levels first. Take the ground down around all four flowers with a wide gouge before you shape anything. Decide which flower stands tallest and which leaves drop below it.
- Mark the facing. Draw a circle on each flower with a slash through it showing which way that flower leans. The deep side of the hollow follows the slash.
- Open the rim. Take the first material out with a deep one inch gouge, working across the grain from the rim toward the middle of the marked circle.
- Check what is behind you. Turn the blank over and feel behind each hollow. Thin stock and hidden screws both live there, and neither announces itself through the front.
- Deepen, then clean the walls. Swap to a wider shallow sweep, take the floor lower, then shave the standing ridges away. Leave the outline uneven. The sphere going in was carved by hand too.
- Small flowers, small tool. Use the one inch gouge only on the remaining hollows. A three inch sweep cannot reach the floor of a small flower without damaging its walls.
Frequently asked questions
What sweep gouge hollows a bowl best?
Deep sweeps, an 8 or a 9, leave a proper hollow behind them. Their curve digs rather than skims. A 3 or a 5 gives you a saucer, which is useless once a sphere has to drop into the middle of it.
Can I hollow a flower with a knife?
A knife gets you started and then stops being useful. Once the walls rise above the floor there is no room to swing a blade, and the edge ends up levering rather than slicing. Reach for a curved gouge instead.
How deep should the hollow go?
Deep enough to hold the sphere that caps it, and no deeper than the wood behind allows. On this board a quarter inch, roughly 6 mm, was the thinnest wall remaining. Feel the underside before every fresh pass.
What to carve next