
Alexander Grabovetskiy, woodcarver, School of Woodcarving · Published 2018
Why does a carved flower start out as a donut?
Quick answer: A carved flower begins as a ring of wood surrounding a hollowed middle, because the outer petals lean back and down while the inner ones turn up. Shaping that ring first gives every petal a place to grow from. The ring is then made uneven, since a perfectly even circle looks turned rather than carved.
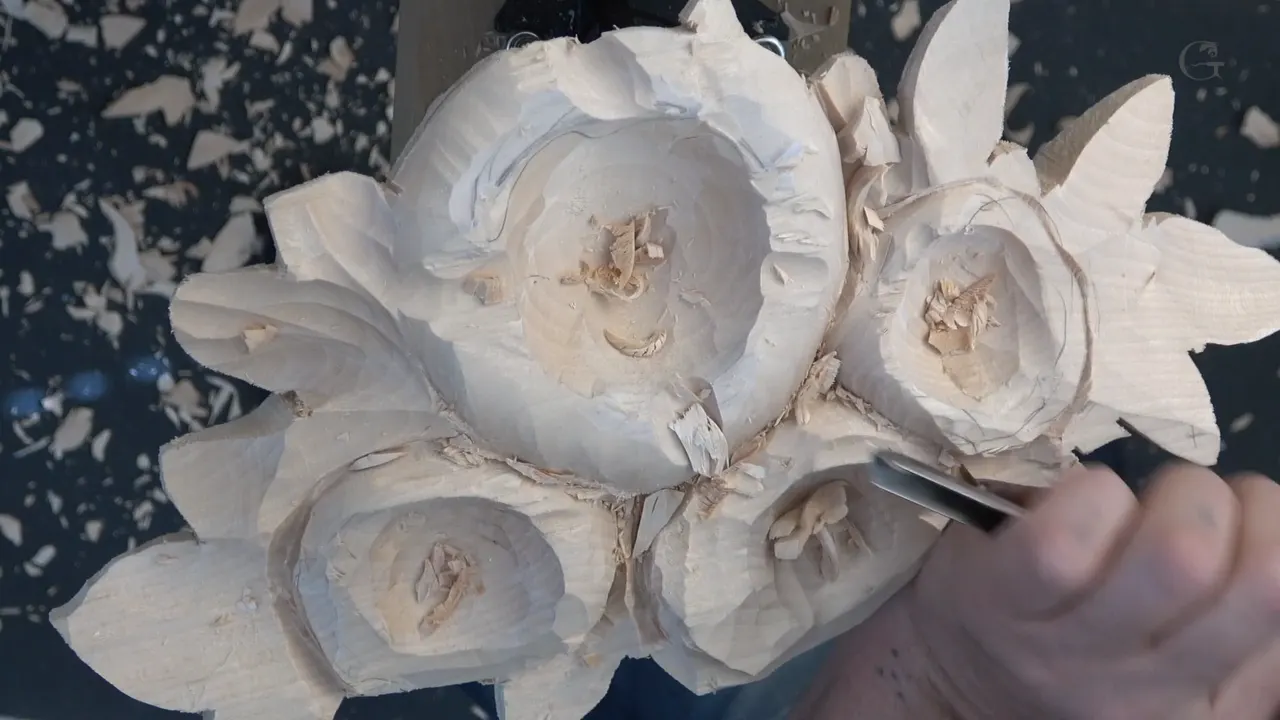
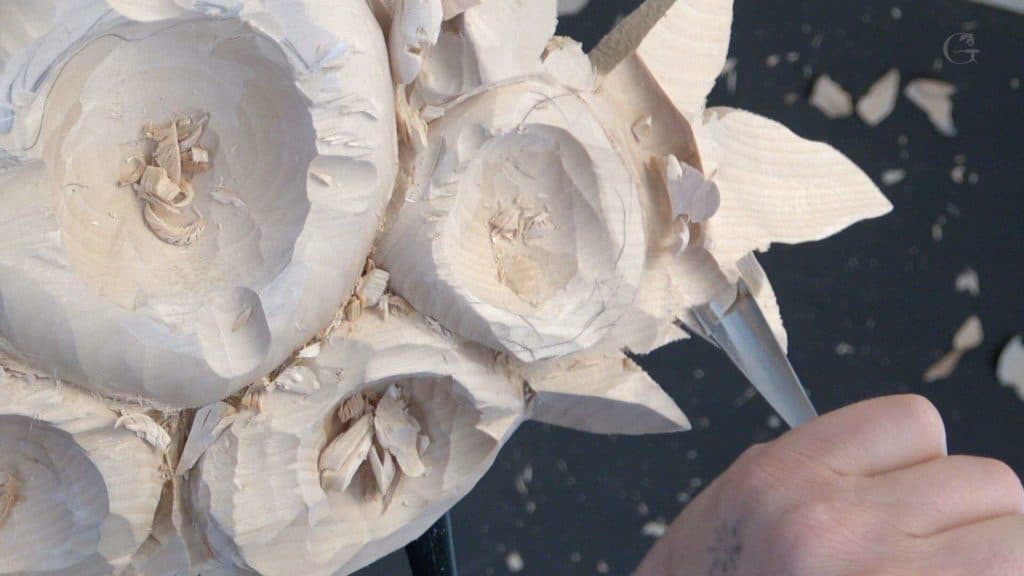
Round first, then wavy. Every flower on this panel starts as a ring of wood standing around its own hollow middle. I said donut on camera and I will say it again here, because that is what it looks like and no student has ever misunderstood the word. Nothing about it is a real donut. Part of that ring rides high, part of it falls back, and the difference between them is the whole job.
Ever shaped petals straight onto a flat blank and watched them come out looking pressed in with a stamp? Did every one land at the same height? Petals need somewhere to come from. Give them a ring to grow out of and they arrange themselves almost without asking.
Lesson 29 of the Hashemi flowers panel follows straight on from the hollows I dug in lesson 28. Four flowers, four hollows, and now each one needs the wood around that hollow turned into a ring. Separation cut first. Then the ring, then the waviness that keeps it from looking machined.
What the first ring has to do
- Stand proud of the hollow it surrounds, so the middle of the flower reads as lower down.
- Sit higher or lower than every neighbour.
- Rise and fall as it travels round its own circle, never once running level, because a level band is what a lathe makes.
- Carry the movement of the whole layer.
- Land roughly where the drawing put it, measured by eye alone.
Why does a carved flower start out as a donut?
Petals grow outward from a centre. The outer ring of them leans back and down before the inner rings turn up again, so carving that ring as one continuous form first gives all five or six petals somewhere to come from. Carve the petals first instead and you will spend what is left of the day fighting them, one against the next.

Donut is mine, not a term out of any book. Students remember the word, and remembering is the only job a word has. What the old books call the first ring or the first layer of a flower is the same shape, and you will find it under every carved rosette in any old house you walk into.
Semi donut is closer to honest. A true ring, even the whole way round, would look turned on a lathe. This one climbs here and drops there, and an eye reads that as something alive long before the person works out why.

What is the separation cut for?
Two flowers sitting at the same height read as a single blob. So before any ring gets shaped, I go round each flower and drop the ground beside it, which parts it from its neighbour and tells me where one form ends. Preliminary, right round, and not gentle.
| Tool | Method | Strength |
|---|---|---|
| deep 9 gouge, five eighths or 16 mm | driven with a light mallet | opens the ground fast on a first pass round a big flower |
| V tool, a 16 at quarter inch | walked round by hand, no mallet | parts two shapes |
| shallow 5, one inch wide | pushed | safer beside an edge that has already gone thin |
| wide 7 | long sweeping passes | tidies the mess the other three leave behind them |

My mallet here is a 12 ounce, about 340 grams, which is small for a mallet and right for this. Anything heavier and the tool goes past where I wanted it on a panel this thin. Weight is a choice, not a badge. A heavier head simply carries the edge past the line, and you feel that on the very first pass instead of finding out later.
The V tool version works just as well. Mine is a 16, a quarter inch wide, ground at 35 degrees, and that narrow angle reaches a long way into a corner. I set out why the V tool so often goes first in lesson 17.

Which gouge turns a hollow into a ring?
Shallow, and wider than the hollow itself. A number 5, one inch or 25 mm across, shaped all four of these, and the sweep runs from the inside outward so the wood lifts off the middle steadily. Going the other way tears the rim off.

Sweep matters more than size here. A deep 8 or 9, the tool that dug the hollow in the first place, leaves grooves too pronounced for a surface that has to carry one curve. Shallow sweeps blend. Deep sweeps dig, and that work is already finished by now.
A good many of mine are Ashley Iles, and the wall behind my bench runs four shelves deep. Nobody needs a wall. Three sweeps carved every flower in this lesson, and a beginner holding a shallow sweep, a deep one and a single V tool can follow every minute of it without buying anything else at all.

Why must the donut be wavy?
Flat rings look stamped. Once the shape is roughly there I take a deep 9 again, five eighths wide, and put a few pushes into the ring in places I have not planned, dropping one spot and leaving the next standing. The ring stops being a circle and starts being a flower.

Where those pushes land hardly matters. I do not mark them, I do not count them, and if you carved this panel beside me yours would fall in different places and look just as right. Freedom like that is what beginners find hardest to trust in ornament work.
Waviness on the outer edge comes next, and I mostly do that with the same tool. Later on smaller gouges refine it. What you must not do is smooth it all back out again on a tidy afternoon, because the roughness there is doing work.

Look at a real petal in your garden and you will not find one flat plane on it. Nothing in nature repeats. That is the entire argument, and it holds for acanthus as much as for flowers.
How much wood can you take at once?
More than you think, while the shapes are still rough. Because the flowers have to sit at different heights anyway, a wrong cut usually just moves a shape down a level rather than ruining it, so I work with a lot less caution here than I will tomorrow. Detail work is where the hand slows down.

One side of this panel turned out far thicker than I needed, and instead of leaving it I took the whole side down and tilted that flower, so now you meet it from an angle rather than face on. Three flowers looking straight out at the viewer is a wall. One turned sideways fixes it.
That decision came from the wood, not the drawing. I had material there and it was doing nothing, and the same thinking runs right through lesson 27, where the thickness of a blank decides which flower gets to be the tall one.

There is a blue pencil line running down one side of the board from the drawing stage, and I never rubbed it out. You can still see it in the video. Nothing depends on it.
How do you stop four flowers looking identical?
Give each one something the others do not have. One here got made wider than the drawing asked, another sits lower than its neighbours, a third leans away, and the fourth keeps its ring shallow. Four separate small decisions, none of them planned in advance, all of them made in about ninety seconds.

Repetition is what makes carved ornament look printed. A frieze of identical carved rosettes may be what a machine would produce, and a person walking past reads it as wallpaper in about a second. Vary them and the same wall holds a person for a minute.
The board here is lime, or basswood if you buy it in America, and it forgives this sort of on the spot decision because it carves the same in every direction. I went through what makes a line flow, and what makes it dead, back in lesson 2.
Nobody carves four identical flowers on purpose, and yet a whole shelf of student work comes out that way, because copying the same shape four times feels like consistency. Far from it. Consistency lives in the handling and the tool marks, never in the outline, and an eye knows the difference at once even when the person cannot say why.
Old carvers went further than I do here. Look at the carved ornament in any old house and try to find two leaves that match, and you will be there a while. I read that as a shop under real time pressure choosing variety anyway, which tells you how much they valued it.
Do you measure any of this?
Measuring plays no part in it. My aim is to land as close to a real flower as the wood allows while staying more or less true to the drawing, and if one ends up a few millimetres off the pattern, that suits me fine. A panel is not a machined part.

What does get watched is thickness. One edge on this board was down to a sixteenth of an inch, about 1.5 mm, and that is where a V tool undercut turns into a hole. I keep a thumb on those spots and slow down before I reach them.
Judging a line by eye instead of by rule is a skill, and it grows. I went through how I test whether a carved line actually flows in lesson 9, and that test is the closest thing to a ruler I use on a panel like this.
What happens when you rush this stage?
Wood comes off where you did not want it off. Partway through this lesson I took a big 7 across a spot to make it cleaner and lifted material I had meant to keep, on camera, with everybody watching. If it breaks, it was meant to break. I removed the ragged edge and carried on.

I made too many mistakes on this project, and I left every one of them in the videos. There is a version of this course where I quietly reshoot the bad parts and come out looking like a man who never slips. That course would teach you nothing, and I have watched students learn more from lesson 11, which is entirely about a slip, than from three clean ones.
What I did next is the useful part. I put the big tool down and picked up that same number 5, because a shallower sweep going slower is harder to drive somewhere stupid. Changing tool is a way of changing speed.
What do carvers mean by setting in?
Carvers call this stage setting in, and what gets set is the main movement of the layer. Every height, every direction, every which one is on top gets decided here in an hour or two, and the rest of the course lives inside those decisions. Boasting is the other word you will hear for it.

Speed is the surprise. Rough shaping like this takes far less time than anybody expects, and the detail afterwards takes far more. A carver looking at the bench right now would say the panel is nearly there. Wrong by a mile. Misreading that gap is how a carver underquotes a commission and then works the last month for nothing.
Old relief teaches this order of work better than any book does, and it has to be read in person rather than in photographs. The sculpture rooms at the V and A are where I would send anybody who wants to understand what a rough stage and a finished stage actually look like side by side.
Where this leaves the panel
Four rings, all of them different, none of them petals yet. Next the big flower gets divided and the petals themselves arrive, which is where the count starts to matter. Everything today was preparation for that.

Beginners give up somewhere around here. The panel looks worse than it did an hour ago, the shapes are lumpy, and nothing yet resembles the drawing pinned above the bench. Keep going. On this very panel I said out loud on camera that I had made too many mistakes, and the thing still finished.

Working out which shape owns the top layer is design, not technique, and it is settled long before a gouge comes out. The design course covers it, and Grinling Gibbons knew it three hundred years before any of us.

All 49 lessons of this panel sit behind tuition at the school.

How it's done
- Part the flower from its neighbours. Drop the ground all the way round each flower with a deep 9 gouge and a light mallet, or walk a V tool round it. Two shapes at one height read as one shape.
- Sweep the ring outward. Take a shallow sweep about 25 mm across and work outward from the hollow so the wood lifts off the centre. Working inward tears the rim.
- Break the circle. Push a deep 9 into the ring in three or four unplanned places, dropping one spot and leaving the next standing. Do not mark where they go.
- Wave the outer edge. Carry the same uneven treatment round the outside of the flower. Smaller tools refine it later, so leave it rough for now.
- Watch the thin edges. Stop before any undercut reaches a place where the board has gone down to a sixteenth of an inch. Feel for those spots rather than looking.
- Change tool to change speed. When a pass goes further than you meant, put the wide gouge down and pick up a shallower one. Slower tools are harder to drive somewhere stupid.
Frequently asked questions
What does the first ring of a flower mean in carving?
Carvers use the phrase for the outermost band of petals, which falls backwards and downwards, tipping away from whoever is looking. Shaping it as one continuous form before dividing it into petals keeps the whole flower sitting correctly.
Should the ring be perfectly circular?
Far from it. An even circle reads as turned work rather than carved work. Push a few unplanned dips into the band and leave the spaces between them standing, so light lands unevenly across the finished flower.
How hard should I hit the gouge while roughing a ring?
Lightly, with a small mallet. A 12 ounce head, roughly 340 grams, carries enough weight to part the ground without driving the edge past the line on a thin panel. Heavier heads belong on thicker stock.
What to carve next