
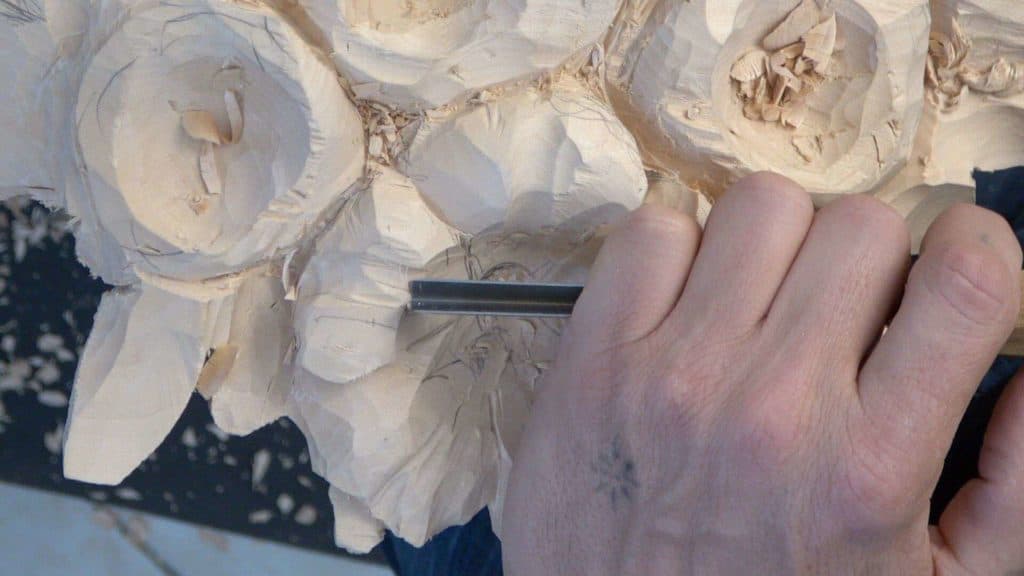
Alexander Grabovetskiy, woodcarver, School of Woodcarving · Published 2018
How many petals should a carved flower have?
Quick answer: A carved flower usually gets five petals, which suits its size and matches what nature does most often. Splitting a petal takes the count to six, and six is wrong, so the next step up is eight. Those two numbers are neighbours in the Fibonacci sequence. Six is not.
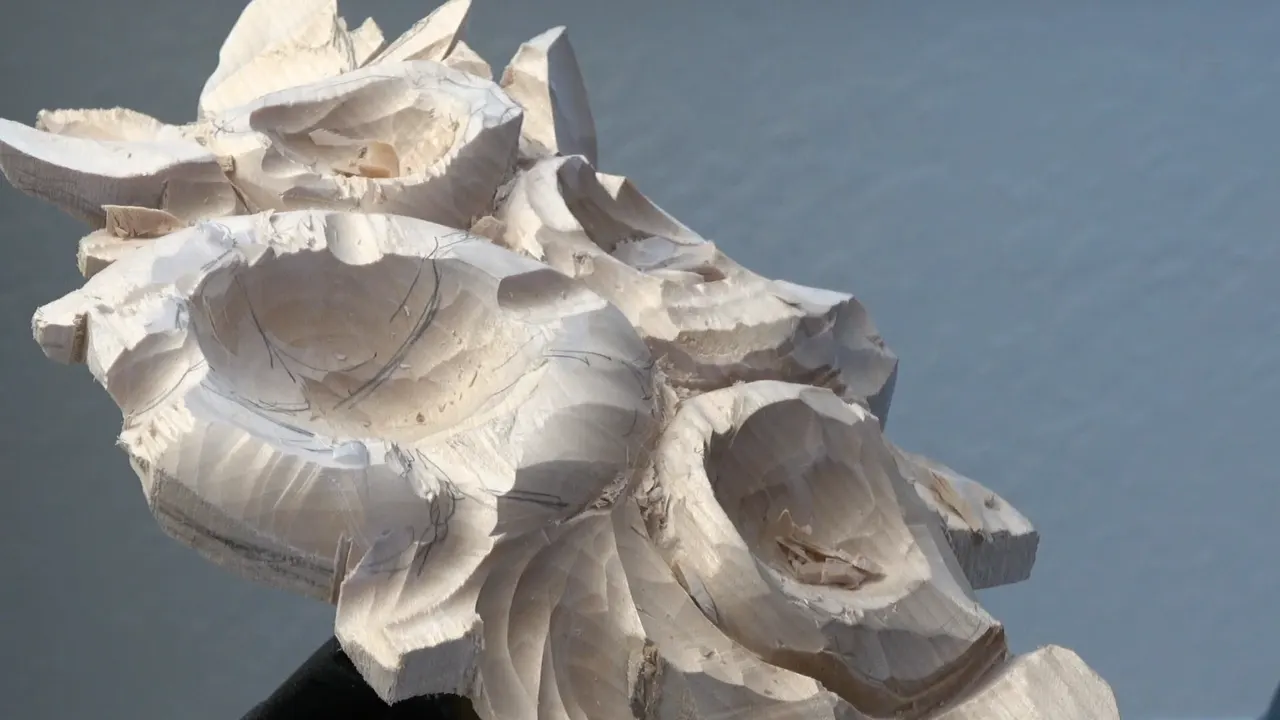
Five to begin with, and if you split a petal you have to go to eight. That jump is the Fibonacci sequence, which I follow on flowers because nature does. Six is where I landed by accident partway through this one, and six is the number to get away from.
Have you ever carved a flower with petals so even it looked pressed out of a mould? Did you count them, or did you just divide the circle until it looked tidy? Tidy is the problem. Nature has no perfection in it anywhere, and a carved flower that argues with that looks like plastic from across the room.
Lesson 30 of the Hashemi flowers panel takes the rings I shaped in lesson 29 and divides them into real petals. Pencil first, then a V tool, then the counting question that nobody warns beginners about.
What the petal count actually decides
- Whether the flower looks grown or manufactured, which is settled before a gouge touches it.
- Where every ray runs.
- How much room each petal has to be hollowed out into a boat shape instead of a lump, and whether the tool you own will even fit into it.
- Which petal can pass under which.
- How the flower will read edge on as well as face on.
How many petals does a flower want?
Five, for a flower the size of this one. Five is the count nature reaches for more than any other, it divides a circle into shapes big enough to carve properly, and a beginner who starts there will not go wrong. Seven works. Eight works.

What matters more than the number is that the petals are only roughly alike. Not identical, not measured, just close enough that the eye groups them. I draw them the way I would draw a flower on paper, freehand, and the differences that creep in are the whole point of drawing it that way.
Count before you draw, not after. Dividing a ring into petals once the pencil is already down means rubbing out and starting over, and the pencil marks left behind confuse you two hours later when the wood has moved past them.

Why skip six and go to eight?
Five and eight sit next to each other in the Fibonacci sequence, and six does not sit anywhere near them. Partway through this flower I decided one petal wanted splitting into two smaller ones. That took me to six. So I hunted for a couple more places to split and carried on up.
| Count | Source | Effect |
|---|---|---|
| three | the number below five in the sequence | far too few for a flower of this size |
| five | where I began on this one | the count nature uses most, and the safest place for a beginner to start |
| seven | not in the sequence at all | I named it anyway, out loud, in the same lesson |
| eight | the next number up once a petal splits | richer |

Honesty about that table. I said seven on camera, and seven is not a Fibonacci number, and both things are true at once. The sequence is a guide I trust, never a law I obey, and on the day it fights what my eye wants I follow my eye.
Where the sequence earns its keep is in the jump. Going five to six barely changes anything, so the change looks like an error instead of a decision. Five to eight is a different flower, and the way real plants arrange themselves lands on those same numbers far more often than chance allows.

Where does the centre of a flower sit?
Rarely in the middle. Each hollow and each rise on a petal runs outward from one point, so that point gets settled before anything else happens. On this flower it sits off to one side. The whole thing grows at an angle instead of facing straight up at me.

Pick the wrong point and every ray afterwards is wrong with it. That is the single most expensive mistake available at this stage, because by the time the error shows you have carved forty lines that all agree with each other and all disagree with the flower.
Finding it is eye work, not measurement. I move my thumb around the ring until the rays in my head look right, and only then does the pencil come out. The same judgement runs the whole design course, and it is a skill that grows, never a rule you memorise.
How do you mark the divisions?
Pencil, then a V tool straight down. The pencil settles the count and the rough shapes, and a couple of vertical passes with the V tool let me actually see where one petal stops and the next begins, which pencil alone never quite shows on a curved surface.

My V tool is a 16, a quarter inch across, ground at 35 degrees. That narrow angle reaches a long way into a corner and it leaves a clean line on both walls at once. A wider V leaves a shallower valley that gets lost the moment you start shaping.

Straight down means straight down. Angle that first pass and you have committed to an undercut before deciding you wanted one, and taking it back costs you the crisp line you were after. I went through why the V tool so often leads in lesson 17.
Why must a petal look like a boat?
Petals are hollow, not round. A carved petal left as a dome looks like a pebble stuck to a ring, and the fix is to dig material out of the inside of it until the surface curves like the inside of a boat. Round is the enemy here.

Some of those hollows go deeper than others, and the outer edge of the whole flower wants waves cut into it as well. A deep 9 puts them in fast. Smaller gouges refine them later, and I could refine forever, which is why knowing when to stop is its own lesson.

Look at a petal in your garden before you argue with me, or at a carved acanthus leaf, which obeys the same rule. Find a flat plane on it. You will not, and that is the entire case for every dip I put into this wood.
How far should you undercut a petal?
Further than the front view needs. One little shape on this flower grows out from underneath another, and to show that I lay the V tool over on its side and reach in under that edge, which is a semi undercut and not a full one.

Sometimes I go a little extreme with it, knowing most of what I carve there will be hidden by the layer above. People look at a panel edge on. They catch small things down in the shadow, and an unfinished joint is exactly what they find. Undercutting has a second use. A shape looks bigger once it has been reached under, which is worth knowing when a leaf comes out meaner than you drew it.

Which petal passes under which gets decided right here. In a real flower they are never fully separate anyway, so one always lies over its neighbour. I changed my mind more than once before committing, and I worked through how to make that call in lesson 26.

Which tools carve a petal?
Small ones, and more of them than you expect. A number 5 at a quarter inch takes the wall out of a petal. Deep 9 gouges of the same width put the concaves in, wider sweeps blend those surfaces together, and a flat chisel eight millimetres across leaves a straight facet wherever I want light to break.

A carving knife earns its place too. Mine is a number 12 and it reaches into corners where no gouge handle will fit, which makes it an excellent tool and not the beginner toy people assume. I use it on the outer edges here.
Nothing on that list is exotic. Each one lives in an ordinary carving set, and the wall of tools behind my bench exists because I have been at this for over forty years, not because a flower needs it.

Why leave the tool marks in?
Shadow. Every facet a gouge leaves standing catches light from one direction and loses it from another, and a flower covered in them changes as you walk past, which a sanded flower simply does not do. My opinion, and you are free to disagree.

Sandpaper is fine if you want it. Completely fine, and I will not think less of anybody who reaches for it. The surface just goes quiet, the facets disappear, and the piece stops moving in the light, so the choice is really about what you want the finished thing to do.
Old relief carving that I have stood close to was not sanded smooth. The sculpture rooms at the V and A hold work by Grinling Gibbons, and it repays walking right up to the glass.
Will four flowers carved the same way look the same?
They will not, and that surprises people every time. All four of these get treated alike, with one set of tools in one order of work, and they still come out different from one another, because a hand is not a machine and the grain under each one runs its own way.

So there is no need to invent differences at this stage. Carve each flower as well as you can and the variation arrives on its own, which is a relief to anybody who has stared at a panel wondering how to make number three interesting. The wood handles it.
What you must not do is copy one flower onto the next by measuring. That is how a panel of carved ornament ends up flat and repetitive, and the same judgement decides whether a carved line flows at all, which I went through in lesson 9.
When do you stop refining a petal?
Earlier than your hands want to. Smaller and smaller gouges will keep improving a petal all afternoon, and somewhere in there the flower stops gaining and starts losing, because every extra pass evens out the surface you spent the morning making uneven.

What I go by is shadow, since throwing shadow is the whole job a facet has. Once the light is breaking the way I wanted across a petal, that petal is done, whatever my hands think. Creative is the word I use on camera here, and it means your judgement instead of my instructions.
Perfect is the thing to avoid. A petal that has been worked until every surface agrees with every other surface has become an ornament off a shelf, and the panels I care about in old houses are full of shapes that were clearly stopped rather than finished. That difference between stopped and finished is worth more to a carver than any single technique I could hand over, and it is the real subject of lesson 24.

Why do more mistakes happen late in a session?
Your hands are still set to the big tools. When you rough a shape out and go straight to fine detail in the same session, the hands that have been driving a three inch gouge all morning pick up a quarter inch one and keep pushing with the same weight behind them.

I make more errors on those days than on any other, and I said so on camera during this very lesson. The fix is not willpower. Put the piece down, or stop after the roughing and come back tomorrow for the detail, which is what I would tell a student and what I frequently fail to do myself.
Speed is the trap underneath all of it, and I have argued about that plainly in lesson 18. Getting as much done in one day as possible is not the same thing as getting on.
Where this leaves the panel
Real petals at last, on the biggest flower, with the three smaller ones still waiting their turn. Each will get the same treatment and each will come out slightly different, which is what I said would happen back when they were still rings.
Three smaller flowers are next, then the third layer goes on top of everything, and the socket work I did in lesson 27 is what holds that layer down.
All 49 lessons of this panel sit behind tuition at the school, and the basswood board it starts from, which is lime by its other name, is not cheap. Professional wood never is, and you have to be real about that.
How it's done
- Settle the count first. Decide on five petals before any pencil goes down. Splitting one later means going up to eight rather than six, since those two sit side by side in the sequence.
- Find the centre. Locate the point every hollow and rise will run out from. It sits off the geometric middle whenever the flower grows at an angle rather than facing you.
- Draw freehand. Sketch the petals the way you would sketch a flower on paper, roughly alike and never identical. The differences that creep in are wanted.
- Cut the divisions straight down. Run a quarter inch V tool vertically along each pencilled division so you can see where one petal ends. Angling this pass commits you to an undercut too early.
- Hollow each petal. Dig the inside of every petal with a deep quarter inch gouge until it curves like a boat. A domed petal just looks like a pebble.
- Reach under the overlaps. Lay the V tool on one side and work in beneath any petal that passes under its neighbour. Go a little further than the front view demands.
- Wave the outer edge. Cut dips into the outline of the whole flower with a deep 9, then refine with smaller gouges and a carving knife.
Frequently asked questions
Can a carved flower have six petals?
Six sits between two numbers the eye accepts and belongs to neither, so the change from five reads as an accident. Going to eight makes the same decision look deliberate. Real plants land on those counts far more often than chance would explain.
Do all the petals have to be the same size?
Roughly alike is the target, never identical. Sketch them freehand and let small differences appear, because measured petals give away the fact that a human never really looked at a flower.
What gouge hollows a petal?
Deep sweeps in small widths. A 9 at a quarter inch digs the concave out. Wider sweeps blend the surfaces together afterwards, and a flat chisel leaves a facet where light should break across the form.
What to carve next