

Alexander Grabovetskiy, woodcarver, School of Woodcarving · Published 2018
Why carve a flower separately instead of from one thick block?
Quick answer: Carving a flower separately is about reach rather than lumber. One block tall enough for this peony would leave no room for a tool behind the edge, and undercutting then becomes impossible. Cutting a socket lets the blank be shaped in the open and dropped in later.
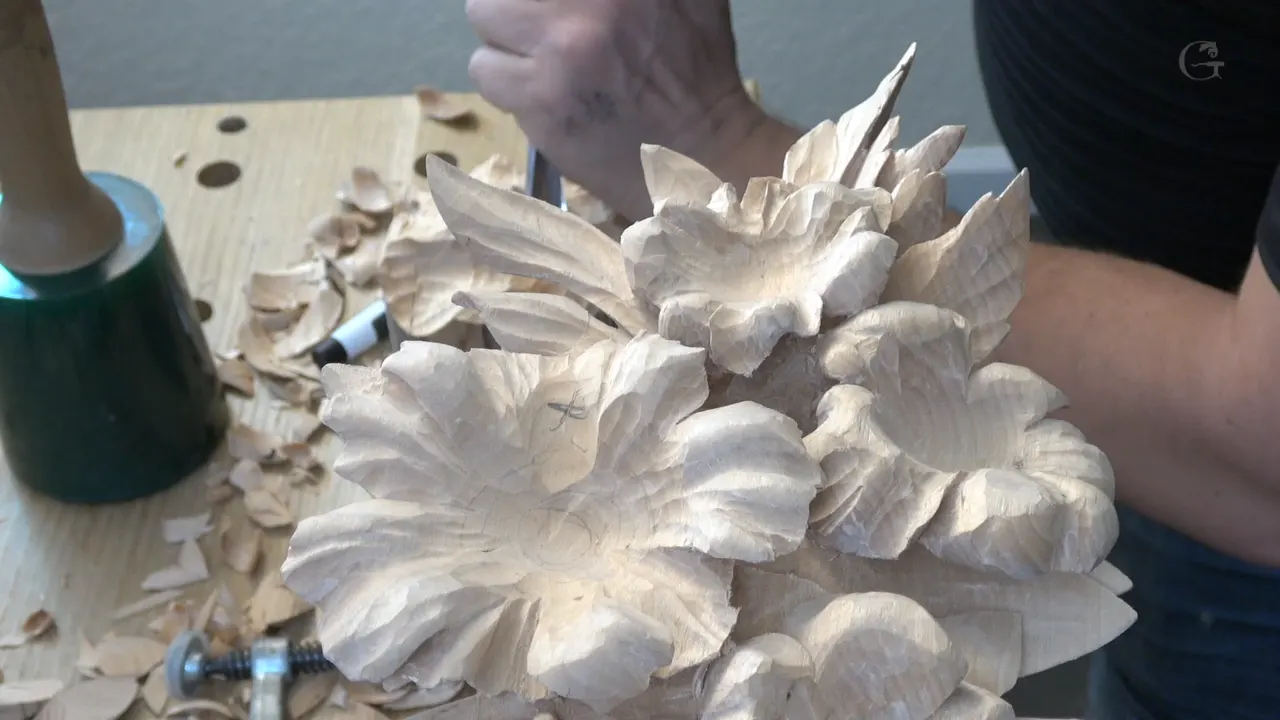
Because you cannot get a tool underneath a shape carved that high out of one board. The lumber is the small objection. The real one is reach. A socket lets me shape that blank in the open, undercut it from every side, and drop it into the panel afterwards.
Ever tried to undercut something standing four inches proud of its background? Where did your hand go? There is nowhere for it, and nowhere for the tool behind it either.
Lesson 42 of the Hashemi flowers panel stops carving and starts fitting. Four flower blanks, two board thicknesses, a pair of clamps, and a pencil mark that matters more than any of them.

What this lesson sets up
- Why the sockets exist at all.
- Two boards, one twice the thickness of the other.
- An X on the blank and an X on the panel, in the same place.
- Hand drawn circles, deliberately imperfect.
- Seven eighths of an inch removed before any fine fitting starts.
Why carve a flower separately instead of from one thick block?
Reach. Everything else follows from it.
The panel is already two inches thick and this peony has to stand well clear of it, so carving the whole thing from solid means starting with a block over six inches deep, by my reckoning at the bench. That is expensive, and I say there is no reason for it. But the sentence I say next is the one that matters: it would be really hard to reach the areas inside, and really hard to undercut. A tool needs room behind the edge, and a shape sunk in a canyon of its own waste does not give you any. Carving high relief without a thick block solves the height problem on this same panel from the other direction.

How thick are the two boards?
One came off an eight quarters board and the other off sixteen. Measured, a shade under two inches, and three and five eighths.
Both fall short of nominal, and on camera I say so about the thicker board. Not exactly four inches. Rough sawn stock loses thickness to surfacing, so the thicker grade rarely arrives at a full four inches. Measure what you actually own before designing around it, because three eighths of an inch is the whole height of a petal.

How much of the flower disappears into the socket?
About an inch of it, so some two and a half inches end up standing proud of the panel.
That buried inch is doing three jobs at once. It hides the joint, gives the glue a long grain surface instead of an end grain one, and stops the flower ever looking stuck on. The visible height is what you design for and the buried inch is what makes it survive. Worth knowing before you cut a blank to what looks like the right size.

Should you use a compass to draw the outline?
No, and I say so directly. Hand draw it. Do not make it perfect, because it is better when it is not.
A compass gives you a true circle, and nothing in a plant is a true circle. What a flower needs is waviness, a rim that swells on one side and pulls in on the other, and your unsteady hand supplies that for free. A compass is the wrong instrument for a living thing. All four flowers on this panel are deliberately different sizes for the same reason. Smaller, a little bigger, bigger again, and not one of them drawn round anything.

Why mark both pieces before fitting?
It keeps the blank going back the same way every single time. One cross goes on the block and its twin beside the socket, lined up with each other.
The reason is grain before it is convenience. Fitted one way and glued the other, a blank has its grain crossing the panel's, and a cross grain joint moves with the seasons until it opens. That cross also fixes top and bottom, which decides where every later cut runs. It takes two seconds and you will test the fit twenty times.

Which tools did the fitting?
Four, and the biggest is wider than the flower itself.
| Stage of the fitting | Tool | Why that and not something else on the bench |
|---|---|---|
| hogging out the underside | a gouge roughly three inches wide | fewest passes, and none of that surface will ever show |
| the same job with nothing big on the bench | a 7, three quarters | slower, and it takes long anyway |
| marking | a marker | a camera happened to be running that afternoon |
| tidying the centre before another test | an 8 | the blank drops in more easily afterwards |

How do you hold a block that is not flat?
Use clamps that do not care about shape. I reach for Festool ones here and point out that they will grip almost any form, and that the result does not move at all.
Anyone without them can do the same job at the end of a bench with an ordinary C clamp, and I say so on camera rather than pretending the expensive ones are required. One further trick shows up in the third part: the bench stops themselves become support, so the blank has something solid to push against while a gouge works across it. How deep to carve at the roughing stage is the other half of getting a blank ready.

How much do you remove before fitting properly?
Just under an inch, when the socket runs about an inch deep. Deliberately short.
Undershoot deliberately and the first test tells you exactly where the blank is binding. Overshoot and you have a loose flower and nothing to take off. This is the oldest rule in fitting anything to anything, and it survives into carving unchanged: cut to the line on the second attempt, never the first.

Why not just use a knife for this?
You can. It takes far too long. I say both things in the same breath: a knife will remove chunks sideways like this, and it is going to be a long time.
Bulk removal wants the widest tool that fits the job, which here is a gouge about three inches across taking big bites from the centre outward. A knife cuts a line beautifully and moves almost no volume, so using one here is like emptying a bath with a spoon. Match the tool to whether you are shaping or shifting. Whether carving is really just hollows and rounds is the same point about what a tool physically does.

Does the blank have to touch the bottom of the socket?
Not strictly, and I say exactly that. It does not have to, but it makes sense.
Bearing on the floor of its socket, a blank cannot rock, cannot sink further under clamping pressure, and gives the glue a second surface to hold. One hanging on its walls alone relies on a friction fit and on whatever glue reached the sides. Neither fails on a panel hung on a wall, and only one is still tight in fifty years.

Does the grain matter on a face nobody sees?
Here, yes, and I go straight through without apology. I know I am working against the grain, I say, and I am not supposed to, but it is okay, because nobody will ever see this face.
That is a rule worth carrying. Grain discipline exists to protect a surface somebody will look at. On the buried underside of a blank there is no surface to protect, so speed wins and torn fibre costs nothing. Save the care for the part that will show, which is everything from the panel surface upward. Carving detail in end grain is what that care looks like once the surface does matter.

Why use a marker only when filming?
Ink is too generous. I mark the sections to dig out with a marker, then explain the mark is there for the video, and that I probably should not use one because I do not want to remove too much.
A marker line is perhaps a millimetre wide and it hides exactly the edge you are trying to leave. Cut to the outside of it and the fit stays loose. A pencil gives a line you can split. On camera the pencil is invisible, so the marker wins for a different reason entirely, and it is worth knowing that what you see in a video is sometimes staged for the lens.

What do you do about a crack inside the block?
Look at it, decide whether it will ever be under load, and carry on. A crack becomes clearly visible in the third part and my whole comment on it is okay.
Context is everything there. That crack sits in the buried inch, in compression, surrounded by glue and by the walls of the socket. The same crack running up through a petal would be a different conversation entirely. Whether you can carve a board that already has a crack in it covers the version that does matter.

Is this the only way to mount a carved flower?
Not remotely, and I make a point of saying so. This is one of many techniques, there are many different approaches, and you can get about the same result from several of them.
That matters more than it sounds. Carving is full of people teaching one method as the method. A socket and a separate blank suit a deep flower on a thick panel. A shallow rosette wants carving from the solid. A pierced panel wants something else again. Attaching a carved flower to a panel shows the fixing that goes with this one.

Is socket even the right word?
Probably not, and I stop mid sentence to admit it. I am not sure I should even call this part a socket, I say, but for me it makes sense.
Nobody hands you the vocabulary for this. Call it a recess if you like, or a mortise, or a seat. A joiner would have a precise word and a carver mostly does not, because the shape is neither square nor standard. Use whatever word makes the instruction clear to the person in front of you, and do not let missing terminology stop you describing what you did. Half the craft language in English started as somebody's workshop nickname.

What does a perfect fit feel like?
It simply drops. No rocking, no gap that will catch a fingernail, and the bottom of the blank touching the floor of the socket. The finish level agreed with the customer decides how long you are willing to spend chasing that.
My reaction on camera when it finally goes home is short and not very dignified, and then the verdict that it is absolutely perfect. Four flowers, four sockets, and that sound happens four times. Test fits are the whole method: place it, look at where it binds, mark that, take a little off, place it again. I do it four or five times in this lesson alone. Nothing about it is clever. It is just refusing to guess, over and over, until the wood stops arguing.

Why does a cabinetmaker end up doing this?
The two trades need each other, and I have done both.
I built a woodworking firm across Michigan and Indiana before I carved full time, and I only stopped when master friends told me plainly that thousands of people can build cabinets and very few can carve the way I do. So I sold the Felder machinery. What stayed with me is the joinery habit of mind that this lesson runs on: measure the stock you actually have, register the parts so they cannot go together wrong, and undershoot the first cut.

Where this leaves the panel
Four sockets, four blanks in two thicknesses, one of them fitted so well it drops home on its own, and a centre line pencilled slightly off middle ready for the next lesson, because a spine never sits dead centre on anything that grew.
All 49 lessons sit behind tuition at the school. The panel is basswood, the American lime every panel course here uses, with Ashley Iles, Pfeil and Henry Taylor tools on the rack. If the board terminology here is new, lumber sold in quarters is worth ten minutes of reading, and the sculpture rooms at the V and A are full of pieces assembled exactly like this one. Read whether you should wiggle a gouge beside this one.

How it's done
- Cut blanks from the stock you actually own. Eight quarter stock for one blank and sixteen quarter for the other, both short of nominal. Rough sawn stock loses thickness to surfacing, so measure before designing.
- Draw the outline freehand. No compass. A true circle looks nothing like a flower, and an unsteady hand supplies the waviness for free. Make all four different sizes while you are at it.
- Mark the blank and the panel together. Same place on each. That fixes grain direction, fixes top and bottom, and you are about to test the fit twenty times over.
- Clamp the blank, shape not being a problem. Festool clamps grip an irregular shape, and an ordinary C clamp at the end of a bench does the same job for nothing.
- Remove seven eighths before fitting properly. Undershoot a one inch socket deliberately. The first test then shows exactly where the blank binds, and you still have wood to take off.
- Test, mark, pare, test again. Place it, find where it catches, mark that, pare off a shaving, and place it again. Four or five rounds is quite normal, and none of that is clever at all.
Frequently asked questions
Can you carve a tall flower from a single block of wood?
You can, and reaching under it is the problem. A two inch panel with a flower standing clear of it needs a block over six inches deep, and no tool has room behind its edge in a hole that size.
What thickness of board do you need for a carved flower?
One blank off an eight quarters board and the other off sixteen, measuring 1 15/16 inches and 3 5/8. Roughly an inch vanishes into the socket, so some two and a half inches stand proud.
Should a carved flower outline be drawn with a compass?
Never. A true circle reads as machined, and a flower wants waviness in its rim. Draw it by hand and let all of them come out slightly different sizes.
What to carve next
- Carving Hashemi Flowers
- Should you wiggle a gouge
- Who decides how finished a commission has to be
- Is carving really just hollows and rounds
- A spine never sits dead centre
- Attaching a carved flower to a panel
- Carving detail in end grain
- How deep to carve at the roughing stage
- Can you carve a board that already has a crack
- Tuition at the school