

Alexander Grabovetskiy, woodcarver, School of Woodcarving · Published 2020
What does "supposed to" mean when a wood carver says it?
Quick answer: "Supposed to" is my phrase for what a carved shape owes its design, its style or the logic of the ornament. In Venice Room 45, part 12, I took back the word fix and said make it better instead, the way the movement should be.
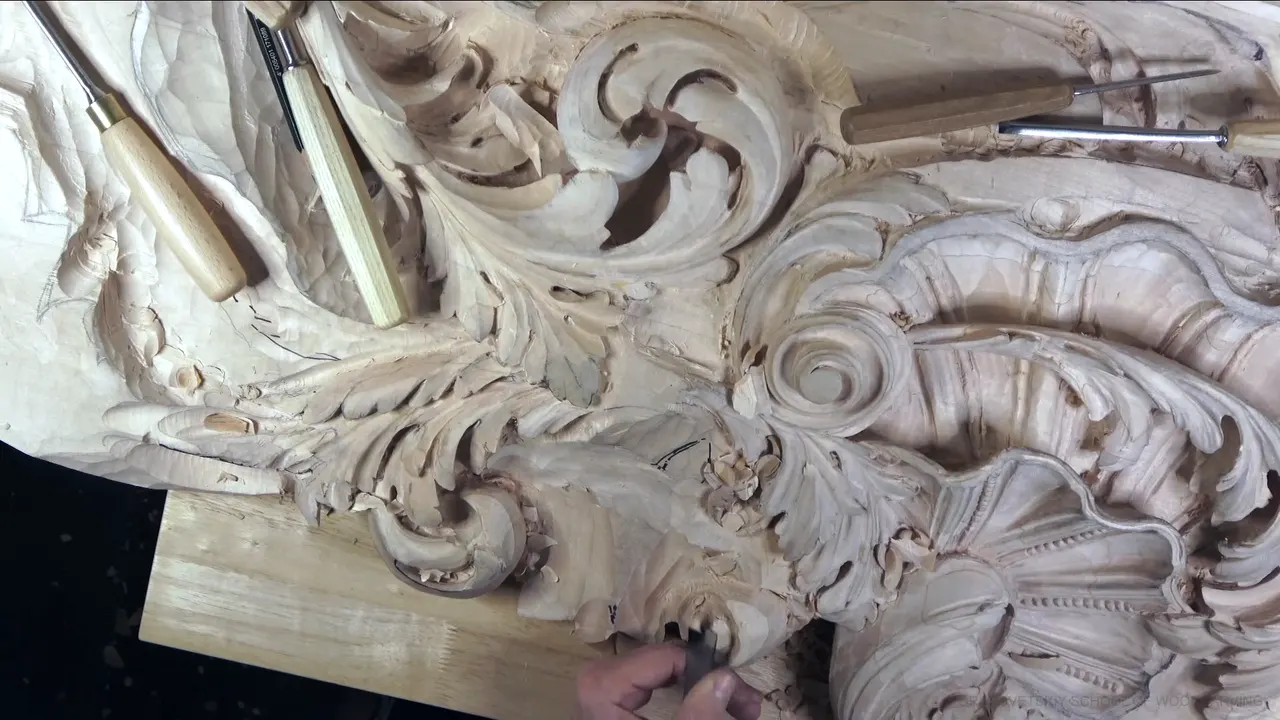

"Supposed to" is my phrase for what a carved shape owes the design, the style or the logic of the ornament. In part 12 of Venice Room 45 I caught a word on its way out. So now I can fix, not fix, but make it better, I said. Like it's supposed to be. Movement, I'm talking about.
Have you ever drawn a leaf and then felt the wood pull your gouge somewhere else? Did the shape still have to end where the drawing said? You already know the words I mean. Part 12 is the last video of workshop 45 and runs about seven and a half minutes, so beside it I put other times I said those two words in my other wood carving lessons, and I name each lesson as I go.
Six places those two words point in my lessons
- The movement, as in part 12, where a better word took the place of fix.
- The center.
- A measure, such as the distances around one shell, which I wanted close to equal.
- The style, since this room had to be original to Venice.
- A stage, when a shape is not yet the way it should look, and I say so.
- A rule I can still bend.
What did I carve in part 12 of workshop 45?

The video opens on the path of the shape. It goes like this, I said, up, up, up, and down below. Then came a worry. Like I said, this makes me worry a little that you probably don't see that too much. But I got too close with my jigsaw. Sometimes, I guess, it happens.

Next was where one part goes. That's going to go up, and underneath of this movement. And yes, this needs to be chopped also, I said, and the tool came as an aside. I'm using number three, by the way, a number three of one inch (about 25 mm). And roll it, I said. Roll it like that.

After that I needed to clean the sides a little. Then a reason for the next job. It's going to go like this, like this, like this, which means I need to make sure this part is the right movement, which means I need to excavate inside right here.
I went back and forth out loud. I don't want to take too deep right here at this point. Or maybe I want to, I don't know. Let me do that. Anyway, I have to excavate right there. Of course, the right direction would help me a little better.
Why did I take back the word fix?

Sixteen seconds after "and go around" came the line this page is about. Fix came out first, and in the same breath I swapped it for the better word and said I meant the movement. Much better movement, I told you, and number three, that's what I'm using.
Right after, I gave the shape a picture. It's like a ball going all the way like this, and it ends up right there.

Then one slope pulled another. I think I kind of like that slope better. So this one also needs to repeat that slope and go in more. Near the end of the video it happened again. Because I changed the slope slightly right here, I need to change this part a little bit, too, and that's going to be better movement.
Was it the final shape?

Part 12 stops short of that, and I told you so. That is not the final shape yet, if you understand what we're doing. We're just establishing that shape, and I did not want to repeat the same like I did on other sides.
My aim was those movements, made a little different. Pretty much the same design as far as the details on them, but little different movements, and that's what I'm after.

With number three again, I said I could probably make a somewhat final movement right here. It has to go underneath this way later on. I also have to deal with how it's going to look from the bottom, when you lay in underneath almost. Clean it, I said, and we can start developing a better idea.
One more correction came in the last minute. Looks like I need to sharpen a little bit, I said, then took that word back too. Not sharpen. Buff my tool.
Where does a carved movement head?

Toward the center, on several of my boards. One is workshop 39 of this course, where I found a middle line and said everything's supposed to go to the center like that. So this pipe goes up, and that one goes up also, and my plan was to stop at that point.

Eight workshops on, in workshop 47, I had the eye and a starting point for the pipe and still asked myself how I wanted to do that. That is the question, I said. The center was still where everything went. Then I had another problem, because one of the leaves could go this way, and I'd probably still have to create another separation.
Even this workshop had a slip of the tongue about it. Back in part 3 I began to say that pipe's supposed to, and corrected it. I meant the movement, which was to go downhill and develop the rest of it.
A Byzantine leaf heads the same way. In lesson 3 of my Byzantine acanthus course the center line is where everything goes, and I asked you to remember the 40-60 rule. For the inner part of two leaves we were going to flip it, so my 60 becomes this part and the 40 goes on that side. It still flows in the same direction. No T-stops.
Lesson 10 of that course put a boundary first, like the shape of a boat or the shape of the leaf, and then everything should flow to the same line.

On my hazelnut board, in the Carving Hazelnuts course, it ran the other way. And here you go, I said. There, everything comes out of the center, so then I can start dividing some other spots.

The word was tangent in workshop 53. Everything had to be tangent there, tangent to the same movement. Four parts later the pipe is supposed to go between those two lines. I had a middle line of one separation, another one right there, and I would put my pipe right between, maybe shifted a little to be closer to the Fibonacci sequence, six parts out of 10.

For workshop 48 I laid in a division early, one of the sides, and it goes up anyway. I reminded you that those acanthuses had a really common convex in the middle and a concave on each side. A separation needed repeating on one side in workshop 49. First we need to find where it ends up, and I believed it should be somewhere right here. I'd do it a little later, because I still had to develop this side.
What should a carved shape look like next to its neighbors?

Close to them. Back in the first course of the room, in workshop 5, I checked the distances on a shell. That distance, that distance, and inside right here, approximately the same. The lip, as I call it because it lips backward a little, also has to match, and right here it was not. Pretty close, but not there. If I need to make little changes, I'll make them, because I want the shell to look really nice.
On workshop 3 it was height. One section had to sit higher than the other, and I wanted to make sure it looks like a full movement, a full head of the acanthus. My plan was a number nine to take one section a little lower.
Over in workshop 79 there was a line to work from. I needed the right position, because I had a specific line I have to reference from, and the turn there is about 90 degrees. It cannot be just laying like that, I said, or I'll be off.

And on my grape leaf vase, in lesson 2 of that course, I was going about 1/16 of an inch deep (about 1.6 mm) near the center line when an eye came up. I reminded you an eye belongs there. There's going to be one eye, I said, and another eye right here was my plan.
Can a half-carved shape look the way it is supposed to?

Only part of the way. My proof is workshop 2 of the first course, where I needed to fix the overall shape, a gradual movement overall, and it was not the way it should look yet.
My Furniture Panel, lesson 20, a carved furniture panel, said it to you directly. Don't pay attention to the outside form, I said, it's not the final form yet. For now it was just the overall shape.
In my Floral and Molding course, on a molding with flowers, the blending went on without you. Just blending, blending, and blending. I don't have to do that on a camera, I said. You had the overall movement idea by then, how it looks and how it ought to look. Then I said to get rid of those facets.

The Roman acanthus has the other end of it. Clean it, let me remove all those chips, and that is the look it should have.
Does the style decide what a carving should be?

For this room, yes. In workshop 6 I said that when I designed this room, I had to stay in the original. It's supposed to be original to Venice, I said. The people carving in Venice developed their own approach, even to the design.
One rule on workshop 56 is about the letter S. When there is a middle line of the main piece, the S, I said, is supposed to face always out, with an exception sometimes.
The words reach past ornament, too. On workshop 55 I showed how a lot of people bang a mallet and get the pain in the shoulder. Really, it should hang free, just inside of your palm. That way your hand is not becoming really tired.
My design course, in its lesson on the law of arabesque, puts it as a fight between parts. A bigger upper part is the hero part, and the guy on its side supports the idea. If that guy looks left, this guy is supposed to look right, and your 60 40 division goes right there.
Another lesson of that course has two spots arguing. One guy says the spot should stay empty, with nothing in it. The other one, the secondary golden spot, says no, busier is better, more is better.
When do I let a shape go against it?

At times, and when I do, I say it out loud. Workshop 66 shows it twice. In part 9 of it I said logically I'm not supposed to have that long separation piece, but that's okay. I hope it's okay. One part earlier I told you that on a Venetian style you're not supposed to have long movements like that, and that beside you nobody else is going to know. It's okay, I said.
Feel can win, too. Sometimes I just have to go by whatever feels better, I said in workshop 29, not just what the design says. If it doesn't feel right for me, it probably won't for somebody else either.
A slip can hide inside it. When something went wrong in one area in workshop 15, I said I don't want to glue anything, and I could make it look as if it was planned.
Which lessons told a shape where to go?
Eight of the passages above, one per row, with what I said right beside them.
| Lesson | What the shape was supposed to do | My words beside it |
|---|---|---|
| This part, 45.12 | The movement, made better instead of fixed, late in the video | Much better movement, my words |
| Venice 39.12 | One pipe going up, with the rest led toward the center | Stop at that point, my plan |
| Room 53, part 9 | A pipe set between two middle lines, shifted six parts of ten | I moved that a little |
| First course, 5.3 | Distances around a shell, all approximately alike | Little changes if I need them |
| Venice 79.1 | A turn of about 90 degrees from a line I reference | Or I'll be off |
| Then 49.3 | A separation that I still had to find the end of | A little later, I said |
| Room 2, part 3 | A gradual movement on a shape that was not there yet | I need to fix it |
| Byzantine 3-1 | Each line on the leaf flowing to the center line | Flip the 60-40 rule next |
The third column keeps my words at the tense I said them, so a plan stays a plan.
Where can you watch the movement get better?

The workshop 45 page covers the whole lesson, and the Venice Room Part 4 course holds all twelve workshops of this acanthus relief, the volute from part 12 included.
Do you have a drawing on your bench right now? Does one part of it already tell you where the next one goes? Then carve along with me, one workshop at a time. The tuition opens every workshop in the room, and you can start here.
How it's done
- Read the path first. Part 12 opened with the path of the shape, up, up, up, and down below.
- Chop what still needs it. Right after saying one part goes up and underneath of this movement, I said this needs to be chopped also.
- Roll it with a one inch number three. My tool was a number three of one inch (about 25 mm), and I said roll it, roll it like that.
- Excavate where the movement asks. To get the right movement there I needed to excavate inside, and I went back and forth on how deep.
- Carry a slope you like. I liked one slope better, so another part I pointed at needed to repeat that slope and go in more.
- Change the other part too. Since I changed the slope slightly in one spot, I needed to change another part a little as well.
- Buff when the edge asks. Near the end I said I needed to sharpen a little, then took it back and said buff my tool.
Frequently asked questions
Should the barrel of a carved volute be round?
Complete, or almost complete round, is how I wanted the barrel in workshop 46 of the Venice Room. A bigger tool was my plan, to see if I could give it a better look. A number seven, I said, though it feels like a number eight, and not long after, that looks good.
Should every acanthus have sharp edges?
Workshop 14 of my Venice Room had a spot where I said just chop a little bit there, because in this type of acanthus that spot should not be sharp. A little later came that is good, really good, actually.
What shape is the eye on a Byzantine acanthus?
A water drop. Lesson 9 of my Byzantine acanthus course is where I said every eye is supposed to look like a water drop, and from each side of that drop it goes downhill, this way and that way. Each leaf between the eyes carries a convex, not a really high ridge, kind of smooth.
What to carve next