

Alexander Grabovetskiy, woodcarver, School of Woodcarving · Published 2020
What does a wood carver mean by "overlap"?
Quick answer: My belief in workshop 53, part 4, was that one separation had to overlap the side beside it, with a slightly bigger outline planned before the divisions. In other lessons I decide which part overlaps which, and I give my reason: the light, the view from below, or the flow.
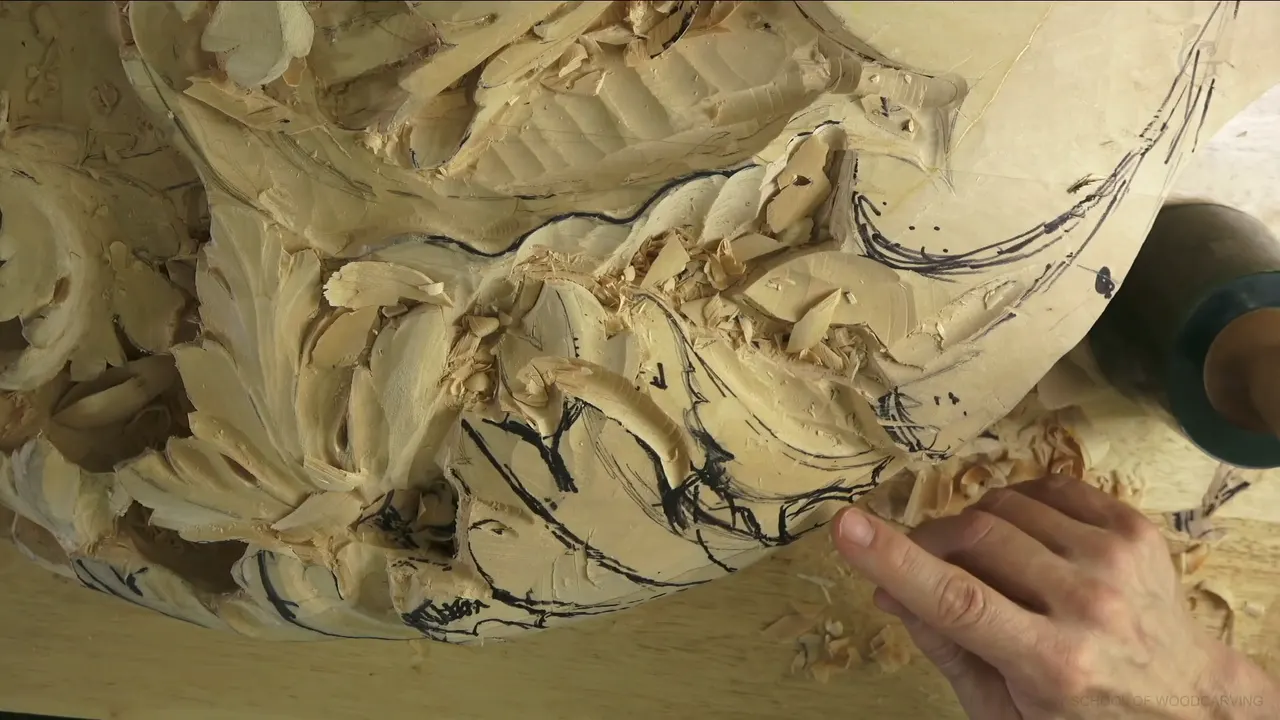

"Logically, I believe this separation right here has to kind of overlap this side," I said in part 4 of Venice Room 53. I wanted to make sure of "which leaf is going to be above of what." The word overlap is in my lessons from other courses too, and below you can follow what I did with it in wood carving.
Ever drawn two leaves that touch and not known which one goes on top? Did you pick one anyway and wonder about the other? That was my question in this part. Below is what I did about it, and where else I say the word.
Where I settle what overlaps what, at a glance
- This part has my belief about one separation.
- A decision about which part goes above is in Byzantine Acanthus 3.
- A leaf in Byzantine 10 looks higher than the part beside it, and a feeling about that leaf is wrong.
- Light and shadow guide the choice in The Tray of Blessing 3 and Carving Hazelnuts.
- Workshops 66, 71, 12, 69 and 56 of Venice Room weigh the choice out loud.
- Furniture Panel 20 and 25 aim for an overlapping motion or effect, and Floral and Molding 5 puts an overlap beside an eye.
What did I mean by overlap in part 4 of Venice Room 53?
"I need to make sure I'm not doing the mistake," I said. A plan sat beside my belief: "Let me first outline a little bigger, and I can overlap divisions later."
For my preliminary separations I planned a smaller tool, "about seven millimeters, I would say, a quarter inch." That is 7 mm (0.28 in) next to a quarter inch (6.4 mm). The plan was to start those separations with it.

I said, "Okay, one," and that there's going to be another one. About one of them I said it could go a little deeper, "although maybe I shouldn't, but it's okay, I've already done it."
I named more jobs. I needed to blend little nicer, and to outline more of what you don't see. "But I really have to." I didn't want to stop the camera because you don't see, and I apologized. You'll be able to see it later, I said, and I'll make multiple pictures later on.

Why call the skew blending preliminary?
The step I named was the skew again, with the plan to blend "this cut." I called the result "a preliminary blending." I asked why it is preliminary and gave my reason, that it has to roll, and I have to make this ridge lower, much lower, later on.
"But preliminarily, I can see exactly how my development develops," I added.

Another part rolls down too, which means I have to make it much lower. I wasn't sure how far to go. "Maybe yes, maybe no." I might roll it, but it will still be detectable somehow.
"Let me start, actually." And "Feel it, this side." The line needs recreating, maybe shifted just a little bit, which gives me a little more chance to shift that slightly this way. A big separation will go right there, and "I think it's good."

What happens to the high spot?
That part will be all taken out, and it will be concave. I could probably take care of it right away pretty much, and at least I can start with the concave right now. The tool was a number 11, 20 millimeters (about 0.8 in), "three-quarter of an inch" (19 mm), and I said I would go deep.
"You should be able to detect right now that movement, how it rolls on inside." The concave will go really deep underneath of that movement, and I have to create a whole "plug cutting" in future.

About one part I said, "I still want to keep the high spot, but I need to go upward little bit." It was "not kinda," I said, with my same tool, "just one side of it."
"Let me reestablish my main movement," I said, and all of that has to be gone. A smaller number 11 was possible, "little bigger than a quarter inch." I'm using 7 millimeters (0.28 in), I said, about 1 millimeter bigger than a quarter inch (6.4 mm).

How do I settle the part that goes on top?
I call it a decision, and so do the lessons below. Byzantine Acanthus 3 says the beautiful movement is one part of the leaf overlapping another, a little overlapping section. "Let's make the decision what's going to overlap what."
I put my tool on a mark and twisted it a little bit to the right, with the flute at about two o'clock, "not all the way to 3 o'clock." The pass was a number 11 at 3 millimeters (0.12 in).

Byzantine Acanthus 10 has a leaf that looks higher than the part beside it. "This leaf looks like it's higher than that part, right?" It feels almost like you have to overlap that one above this one, "But it's wrong." My answer was to follow the flow, so this part goes over that part.
The tool stayed a number 11, 3 millimeters (0.12 in). On a second spot, "the bigger part still going to overlap the smaller part."

Does the light pick the part on top?
In The Tray of Blessing 3 I said I have to follow the logic of how the light will hit, what is above, and where I want to see that shadow. The choice came as a question: "Do I wanna overlap this on top of that one or do I wanna overlap this one on top of this one?"
One lobe was easy: "Logically, again, logically, because it's actually above, I can kinda pack this one underneath." The other was not obvious, because the light would hit most likely "especially at the evening time on the dining table from above." "So it could be either, okay, but what would I like to see?" was my question.
That lobe was "kind of dull," I said, and it doesn't give me a really good motion. A good idea, I said, would be to get it to go right underneath of this lobe. The number seven was my plan for it.

In that lesson I said I'd grab my number 11 again, the flute at about nine o'clock, and blend "a little more toward whatever the overlapping motion I'm after." "It's not much overlapping. You could do a lot more," I said, "but I'm happy with this overlap." If I undercut underneath later, I said, it will look really nice.
Carving Hazelnuts puts it the same way. I wanted to create an overlapping effect because the light will hit from above, and I want to cast the shadow away from the light, which means this part is to overlap the lower part slightly. I'd use a number 11, 3/16 of an inch (4.8 mm), about five millimeters (0.2 in), and the reason, I said, is that I want to create a shadow.
I'd overlap the lower one for the shadow's sake, I said in that lesson. On another section I would overlap that section too.

Carving Hazelnuts 3 has my plan for the overlap. Probably some kind of overlapping, I said, with one part overlapping another part, and it is "just preliminary, like establishing the borders, if you wish," to see visually where my separations will be.
Can an overlap go either way?
I have said it can. Venice Room 66 had a second question after the place of an eye, which one overlaps. The question was which of two parts lies over the other. "Both of those ways actually legit." I thought out loud that it might be more logical, in this case, to "go this one little bit below that."
The same question is in Venice Room 71. "Should I overlap this one over this one or that one over that one?" It's actually both ways going to look good, I said, "But logically, I think I should overlap. That part will overlap this part." A number 11 in 5 millimeters (0.2 in) was my plan, I would say.

About four millimeters (0.16 in) was the size I'd take in Venice Room 12, let's say. This one would not go above that one, I said. "I don't know. Should I or not?" I was just thinking what's going to look better. One option was to continue that movement and get this one below, "which would also be good."
On the view, I said: "Anyway, we have to look from down, and you're not going to see that overlap anyway." So the plan was to take this one down.

The call went the other way in Venice Room 69, and it names the bottom too. The decision there: do I want that part overlapping this part or the opposite? Because it will be visible from the bottom, I think it will make more sense if I overlap. I'll overlap the main body, the main structure, I said, and can actually get an extra division on the inside.
In Venice Room 56 I said, "I could actually overlap with this movement right here." A little bit challenging, I called it. "I have still doubts. What should I do?" Maybe I won't overlap that over this one, I said, "but maybe I'm going to actually cut underneath this part, the right-hand side, in my case, underneath of that movement."

The reason in Venice Room 54 was one section lower than the next. It's already originally this section is lower than that section, I said, which means this one has to overlap a little bit that part, and this part will overlap a little bit the farther part. I used four millimeters (0.16 in), although maybe four millimeters is overkill in this case, but it's okay.
What is an overlapping motion?
The Furniture Panel course has the words overlapping motion and overlapping effect. In Furniture Panel 20 I said, "I'm going to create that flipping motion. Overlapping motion, okay?" It's going to feel like it overlaps, I said, but not too much yet.
In Furniture Panel 25 I wanted to make sure it won't be "straight down cut," and I wanted an overlapping effect.

Floral and Molding 5 puts an overlap beside an eye. One part is to overlap another here, I said, with an eye right there, and that part to overlap the main one. There will be a division, and another division. I'd get half a millimeter (0.02 in) with a number 11, of course.
In Byzantine Acanthus 4 I wanted a part raised up. Looking at the overall picture, I said, it will look like this one is overlapping, really. I added that it goes up from that side toward the middle, and from that point toward that ridge.

In Byzantine Acanthus 10 I used a number 11 gouge, 1 millimeter (0.04 in), on the overlapping leaf, the flute at 3:00, and I undercut it. "It's going to create beautiful overlapping effect." The area would be connected on the bottom, I said, it would still look separated, "but it's not."
I also said I did not go to the line yet in that area, because it could change once I undercut. I'd change the line slightly, I said, and it goes right underneath. "Every time when you see the overlapping area," I said, "you could use that tool."

Workshop 59 and workshop 53 have the word too. In Venice Room 59 I did one section in orange and said another would get a different color. "Although for me, I don't have to because I know exactly which part overlaps which. But just for you to understand, that is going to just be overlapping this way."
Part 11 of workshop 53 has it too. "This part of a main movement overlaps that part. But the higher part of the right-hand side actually overlaps on its own."
Where did I say overlap, and what was I doing?
Side by side, here are the lessons.
| Where I said it | What I was doing there | My words |
|---|---|---|
| Venice 53.4 | A separation taken a little deeper | it's okay, I've already done it |
| Byzantine 3 | A twist of the tool toward two o'clock | make the decision |
| Byzantine 10 | A leaf that seems higher, and a feeling about it | But it's wrong |
| Tray 3 | Weighing the light and the shadow | follow the logic |
| Venice 66.7 | Asking which way the overlap should go | maybe more logical for me |
| Hazelnuts 3 | A plan for the borders | just preliminary |
| Furniture 20 | A flipping motion, kept light for now | not too much yet |
| Floral 5 | A division with an eye beside it | I hope it makes sense now |
Where can you watch every one of these lessons yourself?

Each lesson sits inside a course of mine, and Venice Room Part 5 holds workshops 50 to 61, where this part is. Every course is one click away if you start here.
How it's done
- Name the question. In this part I said I need to make sure which leaf will be above of what.
- A bigger outline. I planned a bigger outline ahead of the divisions.
- Plan the preliminary separations. A smaller tool, close to a quarter inch, was the plan for them.
- Ask where the shadow falls. I named the light, what is above and where I want to see that shadow, in the tray lesson.
- Look from below. In workshops 12 and 69 my reason was the view from down below.
- Undercut the overlap. Byzantine 10 has me undercut an overlapping leaf, the flute at 3:00.
Frequently asked questions
What did I say about one separation in part 4?
I believed, logically, that it should overlap the side beside it. I said I would outline a little bigger and overlap divisions later, and start my preliminary separations with a smaller tool. I also said I really have to outline more of what you don't see.
Can the light decide what overlaps what?
My tray lesson ties the choice to the shadow and to the evening light on a dining table, which comes from above. In Carving Hazelnuts I wanted the light from above and the shadow cast away from it.
Can a carver overlap either way?
Workshop 66 says both of those ways are actually legit. Workshop 71 says both would look good, and still I thought, logically, that one part should overlap the other. In workshop 12 I was just thinking what looks better.
What to carve next