

Alexander Grabovetskiy, woodcarver, School of Woodcarving · Published 2020
What does a wood carver mean by "still possible"?
Quick answer: Viewers wrote me that they could not do that area, and in Venice Room 60, part 4, I answered still possible. The same words come back in other lessons, beside a tight spot, awkward grain, a tool I may not own, and a mistake I made.
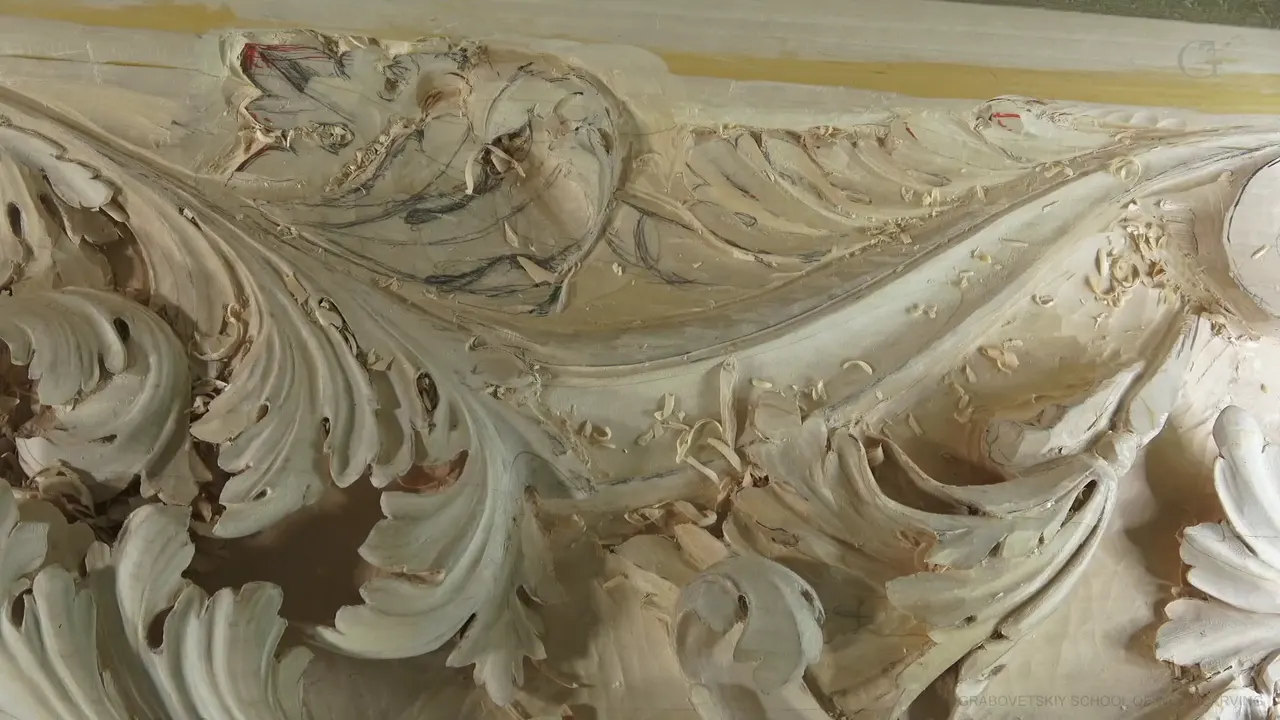

In Venice Room 60, part 4, I said "still possible" to viewers who told me the area I was developing looked too complicated for them. I say the same words in other lessons, and this page lists them.
Have you ever looked at a hard spot in a carving and decided it was not for you? Below is the part 4 passage, then the lessons where I used the same words.
Where was I when I said still possible?

The first thing I said was about my hands. "See the position of my hands. I'm actually using a middle finger, not the way a lot of people are using." That finger was "a leveraging point," a "cranking point." "So I'm cranking against my finger, and that gives me a lot of control."
On the area itself I said: "I'm not trying to get continuous cut in this case, because this area is a somewhat challenging area. It's actually a really challenging area." Then: "For some of you, it's almost impossible area."

And: "I'm not saying that to put you down, of course, by no means." Some of you were writing me emails. "When they're watching how I develop this area, it's so complicated, and they're saying they would never be able to do that, and I would say, well, not true."
Then: "If you watch carefully what I'm doing, it's still possible."
In part 5 I called another area challenging: "I have a challenging area because grain." Then: "The area is challenging because, I hope you understand why, my carving goes to the ceiling." As for the grain: "like in a three-dimensional world." Then: "And blend it nicely."
What did I tell the people who thought they could never do it?

I told them to try. "Just try to be a child again, okay?" The picture I gave was a piano. "When you were children and didn't even know what the talents you had," I said, a parent might ask, "Can you play piano?" The child would answer: "Well, I don't know. I didn't try yet."
Then: "Of course, you can't know until you try. So please don't limit yourself. Just try."
About the size of the job: "The whole project, first of all, I don't think you're going to do because it's not cheap and all. I'm talking about material-wise and shop set up." And: "I don't know how much space you have. The whole project like this is going to take a lot of space."
Then: "You take a chunk and try on a piece of wood or section and just try to embellish some furniture. Yeah, it is possible."
What was I working on after I said it?

"Essentially, I'm just working on creating that long pipe, and I'm getting deeper and deeper." My goal, I said, was to exaggerate. "Exaggeration of pipe. That's what I'm working on."
Two sides were in my plan, I said. "So one side, and I'm going to do a cut on another side also." Next: "Let me start opposite direction movement and see how it's going to behave." The "it" was "my block of wood." Not the gouge. "Gouge is really sharp, so I'm keeping my gouge just really super sharp."

A smaller pipe was exaggerated too. "See how I exaggerated this pipe also? It is smaller than the main pipes, but still, it's kind of exaggerated." I took up "sweep number eight." About the marking: "Don't pay attention to the number two at the beginning." The size was "six millimeters, one-quarter of an inch" (6 mm is 0.24 in, and 1/4 in is 6.35 mm).
The plan was to "hit little by little," although "looks like I'm doing wrong. I'm doing from wrong side." Then I questioned my own word: "It all depends what you mean by wrong side, because one side right now it's clean and another side is not." The left side was "little more important" to me, "so I should do it a little cleaner."

"That is good, but now let me think." Then: "I really don't need this ridge, so I need to take care of it. A couple ways I could take care of it." I planned to try one tool, and I left myself a way out: "If it's not, I can always try another tool. I have no problem with that." Of the tool I tried: "It's just like using knife pretty much. I could use just a knife."
"I need to blend little better right here." And of the mess: "Yes, I do have a little bit mess what I just created, and inside of that cut." To clean it, I would "go back a little bit and hit that with the same tool until it's clean."

On the acanthus I said: "I still want to be really authentic to that raising part of acanthus, and I hope you already understand why." And "right here, I don't like. It doesn't look clean." Of the inside I said: "I need to hit that with, like, number nine, maybe about 10 millimeters, I would say, on inside" (0.39 in). Then: "Let me see if I'm going to be able to do it uphill. Maybe I just have to attack from couple positions."
Which lessons use the same words about a tight spot?

In Lily Box 8, part 11, I had mess I created on the inside to remove. "I'll try from different points. It's a really tight spot." I put it as "still possible," and my plan was to "use a mallet and carefully attack that." Then a second plan: "Let me use a 3 millimeters number 11" (0.12 in), "and hit that harder."
Workshop 70, part 10, has a spot where I already had the main body. Undercutting there would be "kind of tough" and "a little challenging." The words I put on it were still possible, "but different technique I should use."

Over in Venice Room 42, part 4, my line was: "I need to start undercutting all the way up, and carefully approaching to this division." Then: "Kind of hard not to break it," and I called the job still possible. Then: "Just have to be careful. That's it. More careful."

Lily Box 11, part 7, was about a shape I could break. "See how fragile it is?" I asked. "I've got to make sure I'm not breaking anything." Keeping it stable "is not easy," I said, and I put it as "not impossible," with still possible beside it.
How did the grain come into it?

In Venice Room 66, part 9, I said "tool must be really sharp, but that's still possible." Tool: "Ten millimeters, number 11" (about 0.4 in). Once the pass goes against the grain, I said, I can "cut from inside out, with the grain, with the bigger tool and clean it."

Venice Room 71, part 1, was against the grain, "a little dangerous, but it's okay." The plan: leave "maybe about five millimeters" (0.2 in). I called it still possible: "If the tool is sharp, I shouldn't have any problem. And in my case, the tool is really sharp."

The Hashemi Flowers 10 lesson has a pass "across the grain" in part 10. "Not the smartest way to do that," I said, and with sharp tools I called it still possible.

And in Carving Hazelnuts 3, part 3, I was "working into the grain." I said "not impossible" and then "still possible." Then a plan: "Let me get that curl the right direction."
Where did my own tools come into it?

Part 11 of Venice Room 38 has me "using a lot of backbends." "There is absolutely no other way, for example, right here to clean underneath and create beautiful detail." Of that tool: "the only tool which is still possible" for clean passes underneath.
Straight tools come in at Venice Room 141, part 3: "Back bent would help much better in this case. Much better." A good job with straight tools was still possible, if I would "change the position and attack that from opposite side."

The Floral and Molding course, lesson 1, part 3, had a section left to take out and a tool a little too big. With "still only 10 millimeters" (0.39 in), I said, that pass and removing the waste were still possible. Method: "Attack from one side, and then you're going to attack from another side, straight down cut."
Furniture Panel 15, part 10, did without a router plane. "There's a lot of wood carvers in history who've done it." The operation was "exactly the same" as what I was doing "with the flatter gouge," and I added: "As you see," it could be done "just with the gouges."

Carving Plate with Butterflies 13, part 2, put a knife where a gouge would go. "That would be much easier if you would have, let's say, maybe the Gouge. But if you don't," a knife does it. Then: "Just carefully, we are going to start from this point."
Where did I use it after a mistake, or as a warning?

Lily Box 3, part 3: "I've got a really deep cut right here, which wasn't original design or original intention." I called that deep spot still possible. I would try "not to go too close to my edge."
A line I should not cross shows up in Acanthus over Moldings 9, part 1: "I want to make sure I don't hit below that, that would be big mistake." Then: "Although it's not that huge mistake," fixing it is still possible, "but I really don't want to do it." My tool was "the number 11 and two and a half millimeters" (0.1 in).
My own slip is in Venice Room 19, part 10. "I excavated too much closer to that edge, and essentially, I lost the material, which I should not." Then: "Or I could actually move this way a little bit. Still possible." Tool: "three millimeters" (0.12 in), "one-eighth of an inch" (3.2 mm), "number nine."

Safety gets a line in Lily Box 11, part 4: "See how close my finger to the blade is." I was "not exposing more than about 16th of an inch pretty much" (1.6 mm). I would "try to wiggle as much as possible and control it," yet "it's still possible to slip and cut yourself, okay? If you don't feel comfortable of doing it, please don't try."
Not every still possible is a yes. Part 6 of Venice Room 22 has me saying I could curl it "absolutely backward." The question was whether I wanted to. "Maybe yes, maybe no. But I don't think so, because this is a little too high if you look from the bottom."

Venice Room 29, part 1: "I just don't want to take too much material that then it would be too problematic to restore. Because we are doing art of deduction." Then: "And yes," and I called deducting too much still possible.
Hard wood gets a hearing in Lily Box 10, part 1. "Any wood is carvable pretty much, except really rare and it's really impossible, like ebony." Of ebony, carving was still possible, I said, "but it's dense."
Which lesson gave me which line?
| Line I said | What I was facing at the time | Lesson |
|---|---|---|
| A really tight spot | Mess I created on the inside, with a mallet planned | Lily 8 |
| Not easy to keep that stable | A fragile shape I was bringing all the way | Lily 11 |
| The only tool which is still possible | Clean passes underneath, where nothing else fits | Workshop 38 |
| Even with the straight tools | A spot where a back bent would help much better | Venice 141 |
| A smaller tool you don't have | A section I still had to take out | Floral and Molding 1 |
| Without a router plane | Getting close to the final depth with a flatter gouge | Panel 15 |
| Across the grain | A pass I called not the smartest way, with sharp tools | Hashemi 10 |
| Just the patience | An area I called not convenient for almost any types of tools | Greek 13 |
| Kind of hard not to break it | An undercut toward a division | Room 42 |
| Tool must be really sharp | A pass with a number 11 | Venice 66 |
| Because we are doing art of deduction | A side whose next development I had to think about | Room 29 |
Where can you watch every lesson named here?
Each one sits inside a course of my wood carving school. The Venice Room Part 5 course holds workshops 50 to 61, and workshop 60 is the lesson for this page. Other lines come from the Lily Box, Hashemi Flowers, Furniture Panel, Roman Acanthus and Grape Onlay courses. For a place to begin, start here.
How it's done
- Brace against the middle finger. I crank against it, and that gives me a lot of control.
- Watch the area closely. Viewers wrote that it looked too complicated. A careful look, I said, shows it can be done.
- Push the pipe a little past life. My goal in part 4 was to exaggerate it, and I was getting deeper and deeper.
- Keep the gouge super sharp. I'm keeping my gouge just really super sharp, so the wood is the part I watch.
- Try one section, not the whole project. Take a chunk, or one section, and try to embellish some furniture.
- Try before you decide. You can't know until you try, so please don't limit yourself.
Frequently asked questions
What did some viewers write me about the area in part 4?
They wrote that watching me develop it made it look so complicated that they could never do it. I told them that is not true, and that if they watch carefully what I'm doing, it can be done.
Which tool did I name in part 4?
A sweep number eight, six millimeters (0.24 in), which I also put as one-quarter of an inch (6.35 mm). For one spot on the inside I named a number nine, maybe about 10 millimeters (0.39 inch).
How much of a whole project like this should you take on?
You may not want all of it, I said, since it is not cheap in material or shop setup and takes a lot of space. A chunk, or one section, for some furniture is possible.
What to carve next