

Alexander Grabovetskiy, woodcarver, School of Woodcarving · Published 2018
What do you do with the leftover wood between carved petals?
Quick answer: Leftover wood behind a carved petal is rarely waste. Undercut it rather than carving it out, leave roughly five millimetres, and that block turns into a small leaf a lesson or two later. Wood on the floor cannot be recovered, so the decision keeps.
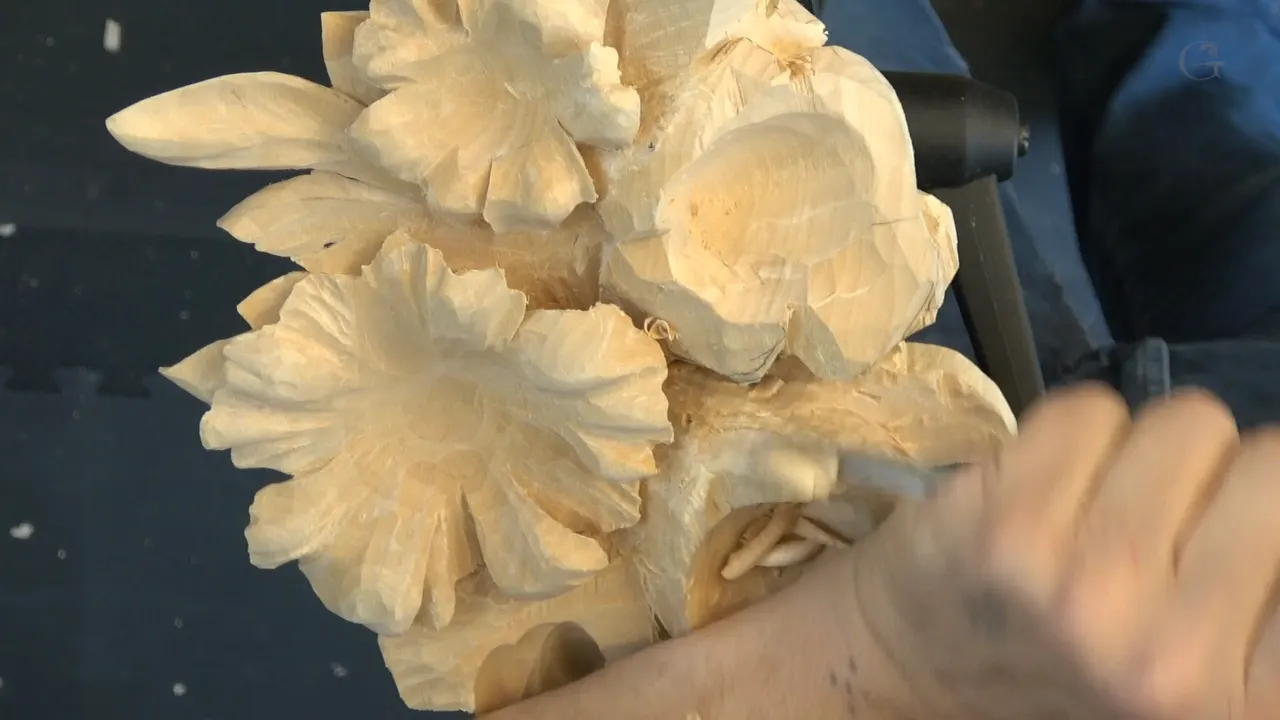
Most of it is not waste, and you find that out by undercutting instead of excavating. The wood sitting between two petals, and the wood the saw left standing behind them, becomes small leaves growing out from beneath it. Leave five millimetres or so standing and you have a leaf later.
Ever thrown away a chunk of basswood and wished for it twenty minutes later? Before you pick up the gouge, do you know which parts of that ring end as flower and which end as air? Almost nobody does. Which is why the good carvers take waste out slowly.
Lesson 35 of the Hashemi flowers panel starts another flower from its first ring and spends most of its time deciding what is rubbish and what is not. Lesson 29 turned a blank into a donut. This one divides that donut into five and then argues with itself about the leftovers.

What gets saved in this lesson
- Three chunks I called waste out loud, then kept.
- Five millimetres.
- Undercutting as a way of asking a question rather than answering one, which buys you a whole lesson of thinking time.
- A saw wall promoted.
- One groove that makes a solid board read as two glued pieces.
- A recount, because I laid out five petals on that ring and then counted only four of them.
What do you do with the leftover wood between carved petals?
You undercut it and leave it standing. Not all of it, and not forever, but long enough to see what it could be.
Three times in this lesson I point at a section, say the word waste, then change my mind on camera. Your petal can stop at its own edge, and the wood past it does not have to go on the floor. Good chunk of basswood, that. Given a form it will read as leafage tucked beneath the flower. It has no form yet. It will.
Put a number on it and the habit gets easier to keep. On this one flower I kept three separate blocks that a faster carver would have dropped on the floor inside the first ten minutes, and all three became something.
Even the language gives me trouble. In the second part I reach for the word junk, hear myself, and correct it to extra material we do not need, which is slower to say and closer to true. Junk is what you sweep off the floor when the shop closes. Extra material is wood with no job yet, and the difference between the two is one decision you have not made. Once the V tool has gone round first and set every boundary, that decision gets much easier, because you can finally see which shapes are real.

How do you decide where the divisions go?
Slowly, and out loud. The first thing I do on this ring is stand there thinking about the best way to divide it, and that pause is not dead time.
A ring of wood has no obvious starting point, so whatever you mark first sets every other petal on the flower. I look for the direction the flower should face, put the first division where the eye will land, then step the rest around from there. One of them runs right underneath the neighbouring flower, which is allowed and often better than stopping short. Which gouge gets picked up most follows the same principle. The work decides, not the carver.

How do you tell waste from a future leaf?
By where it sits, not by how it looks. Wood directly behind a petal, in the shadow the petal will throw, is the best place on the whole panel for a small leaf, because that is exactly where a real plant puts one.
Wood out in the open, with nothing above it, is usually genuine waste and goes to the floor. The test I run is simple enough to do with your eyes closed. Will anything overhang this? If yes, keep it thick for now. If no, get rid of it and give yourself the room.

How much thickness do you leave standing?
Around five millimetres. It is the number I say out loud in the second part, and it suits a small leaf with a curl in it.
Less than that and you have a wafer that splits the first time a gouge touches it from the side. Much more and you have a lump to spend ten minutes removing later, in a spot ringed by finished petals you badly do not want to hit. The number is not sacred. A small leaf needs about that much, and no more.

Why undercut at all?
Undercutting stays reversible in the one direction that actually counts for a carver. Wood left standing can always go later. Wood on the floor means a trip to the lumber yard.
So the first pass under every petal here is a preliminary undercut, slight, made with a V tool held at the angle this panel asks for, numbered 16 on my rack. It separates the petal from what is behind it without committing to what is behind it. Two minutes later I know whether that shadow holds a leaf, and by then the decision costs nothing.

What is a wall in carving, and can you use one?
A wall is the flat vertical face a jigsaw leaves behind when the blank is cut out, and yes, you can use it.
In this lesson one of those walls stops being a leftover and becomes one side of a petal. The saw had already given me a clean vertical surface exactly where a petal needed an edge. Rounding it over would have been honest work and completely pointless. Look at what the machine left before you erase it, because now and then the machine guessed right.
The catch is that a saw wall is dead flat and a petal edge never is. So the wall gives you the plane and the height, and you still owe it a slight roll along the top so it does not catch light as a hard white line. Two passes with a 5, and that is the whole tax on free wood.

Which tools moved the waste?
Four, and the cheapest one did the most delicate job.
| Job on the flower at this stage | Tool | What it actually left behind on the wood |
|---|---|---|
| separating the petals | a V tool numbered 16 | a boundary, with nothing committed to yet at all |
| the main shape of each petal | cheap carving knife | an outline I could read, the only thing I needed at that point |
| hogging out between petals | a 9 at five eighths of an inch | depth, and shadow with it |
| the deep channel and the undercut running beneath it | that same sweep, quarter inch | thickness enough for a leaf later on |
| rolling each petal | a wide 7, then a 5 at one inch | the turn that reads as a flower |

How deep can a carver go underneath a single petal of a flower?
Further than anybody will ever see, and that is the point. I go extreme under there, and I say plainly on camera that it is impossible to watch what is happening.
The reason is light. A deep excavation under a petal fills with shadow, the shadow reads as distance, and distance on a flat board is the entire trick of relief carving. I am not afraid to go deep here because deep is free. Nobody inspects the underside of a carved flower with a lamp, and everybody sees the shadow it throws.

Can one solid board read as two pieces glued on?
It can, and a V tool does it in about four seconds.
Run a V channel along the line where two shapes meet and the eye reads a joint. The petal appears to lie on top of a separate piece that was glued on, when in truth it is one solid plank of basswood and always was. Honest trompe l'oeil, the same illusion painters use, done with a groove instead of a brush.

Why do the tools have to be sharp for this in particular?
A flower breaks every grain rule you were ever taught, and sharpness is the only thing standing between you and torn wood.
I wish it were otherwise. Working only with the grain is impossible on a shape that runs in a circle, so you attack from different angles and some of those angles are wrong by every law in the book. A sharp edge slices where a dull one crushes. Halfway through this lesson I stop, say the quarter inch 9 needs buffing, and go and buff it. Sharpening is not the thing you do before carving. You do it during.

What if you lay out five petals and find four?
You add one. I did exactly that in the third part, counted, came up short, and put another subdivision in where there was room.
Five is what I aim for on a first ring, and the reason is the Fibonacci sequence that real flowers tend to follow. How many petals a carved flower should have gets a full lesson to itself here. Five, eight, on and on. If the number does not appeal to you, carve what looks right to your eye, because your eye is going to look at it for the rest of your life.

What does rolling a petal downhill and inside mean?
It means the petal is not a ramp. A ramp runs down in a straight line and reads as a wedge of wood. Real ones go down and then turn back under themselves, the way the living thing dries on a stem.
A 20 mm 7 does that roll, and the tool does most of the thinking, because a sweep that size has the curve already built into it. Push downhill from the middle of the petal and let it flip inward at the end. Smaller bays want a different sweep entirely, and swapping tools there is quicker than fighting the wrong one. The peony leaf carved in the next lesson gets its shape the same way.

What about the petals you already finished?
Carefully, and preferably not at all. By the third part of this lesson the finished petals are fragile enough that I say so twice, and I mean it as a warning to myself more than to anybody watching.
Two habits help. Work from the outside of the flower inward, so your knuckles are never resting on carved wood, and turn the panel rather than reaching across it. How thin a carved leaf can safely go is the other half of this problem, and the answer there is thinner than feels wise right up until it snaps.

Does the waviness matter, or is that just taste?
Taste, and I say so. The more unevenness we build into these first rings the better the flower looks to me, and another carver would tell you something else with the same confidence.
What is not taste is the reason behind it. A flat petal has one tone across it. A petal that rises, dips and turns has four or five, because each face meets the light at a different angle, and the panel starts to move as you walk past it. So I keep saying waviness when the word I probably want is unevenness.

Is it worth saving a scrap that small?
I think so, and I will admit the habit is older than the carving.
For a stretch of my life in a Soviet prison my pay for a piece of furniture was one boiled potato a day. One potato. You learn very fast what can be used and what cannot, and forty years later I still look at a lump of basswood behind a petal and ask whether it has a job. Usually it does. That small leaf under the flower costs nothing but the decision not to throw it away.

Where this leaves the panel
One more flower divided into five, three chunks kept back for leaves, and a saw wall promoted to a petal edge. Nothing has a finished surface yet. Everything has a place.
All 49 lessons sit behind tuition at the school. The panel is basswood, the American lime every panel course here uses, and my gouges are a mixture of Ashley Iles, Pfeil and Henry Taylor. None of that matters next to sharp. Read hollowing the socket of a flower beside this one, and lowering the background leaves after it.

How it's done
- Divide the ring before removing anything. Decide where the flower faces, mark the first division there, and step the rest around from it. Five subdivisions suit a first ring. One petal can run clean under the neighbouring flower, and that is allowed.
- Outline every petal with a parting tool. A V tool numbered 16 sets each boundary. Nothing is committed at this stage, which is exactly the point of going round with it first.
- Undercut slightly instead of carving it out. One shallow pass under each petal edge. It separates the petal from whatever stands behind it without deciding what that thing is going to be.
- Leave a shelf around five millimetres thick. That suits a small leaf with a bend in it. Thinner splits under a side load. Thicker becomes a lump you have to reach past finished petals to remove.
- Excavate the gaps that really are waste. A 9 at five eighths of an inch does the hogging, a quarter inch one cuts the deep channel underneath. Deep is free, because deep fills with shadow.
- Roll each petal down and inward. A wide 7 at 20 mm has the curve built in already. Push downhill from the middle of the petal, then let it turn back under itself at the edge.
Frequently asked questions
How much wood should you leave under a carved petal?
Roughly five millimetres if you mean to carve a leaf from it. That suits a shape with a bend, and it is thin enough that removing it later costs one pass rather than five.
Is the wood between flower petals always waste?
Rarely. Wood standing in the shadow a petal throws is the best place on a whole panel for a small leaf, because a plant puts one exactly there. Wood out in the open with nothing over it usually goes.
Can you carve a leaf from a scrap left on the panel?
Exactly what happens on this flower. Three blocks I called waste out loud became leafage tucked beneath the petals, and not a single one needed gluing or fitting.
What to carve next
- Carving Hashemi Flowers
- Why a carved flower starts as a donut
- How many petals a carved flower should have
- Hollowing the socket of a flower
- Which gouge gets picked up most
- The peony leaf and its veins
- What angle a V tool should be
- Why the V tool goes in first
- How thin should a carved leaf be
- Background leaves in a wood carving
- Tuition at the school