

Alexander Grabovetskiy, woodcarver, School of Woodcarving · Published 2020
What does a wood carver mean by a fisher's boat shape?
Quick answer: During part 1 of Venice Room 59, I named a fisher boat's front as the idea while I developed one chunk, then asked how far I wanted to take it. Later in the part I said there would be one more boat-like shape, a fisher's boat. Other courses of mine use it too.
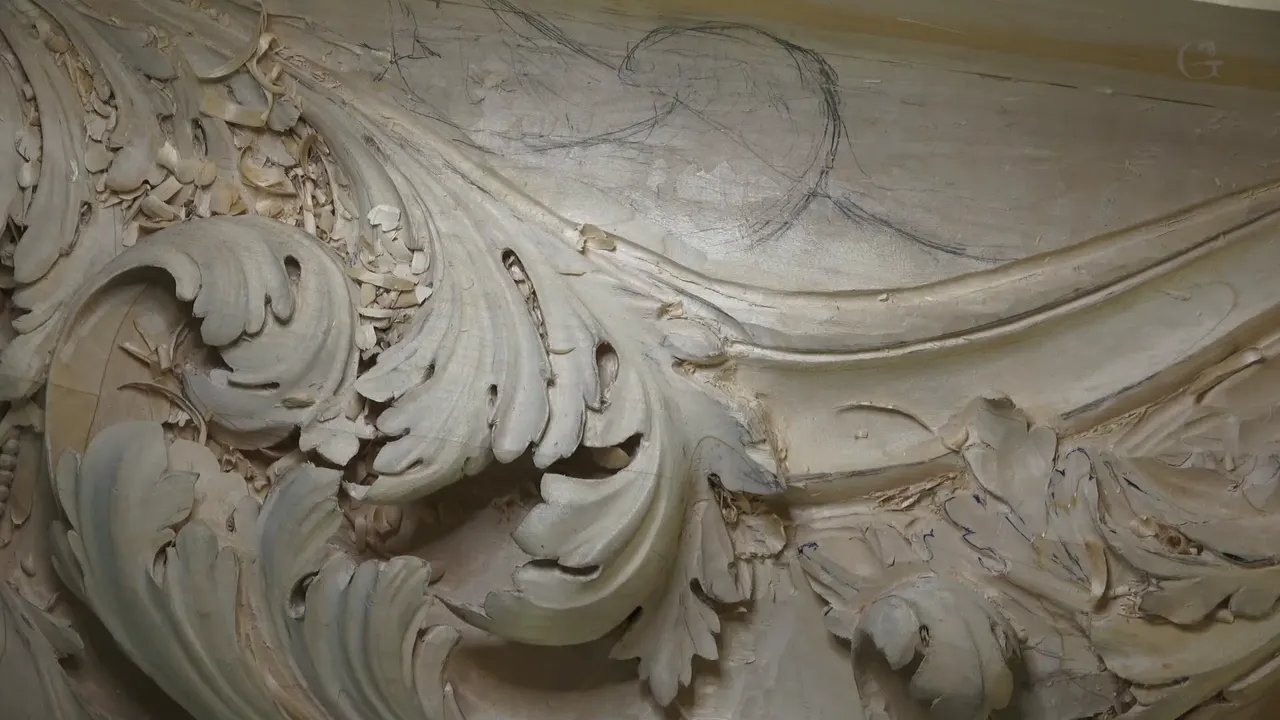

In Venice Room 59, part 1, I told you the idea is that you create a boat, like a fisher boat front. I said it as I started developing one chunk, and a moment later I asked how far I wanted to take it. The same picture turns up in my other courses.
Have you ever drawn a leaf and not known where its edge should go? Would a plain boat shape be something you could sketch on your own board today? Here is where I said it in part 1, and then the other lessons that use the same picture.
What was I looking at when I said it?

Part 1 opens with a question. "Okay, I think I'm ready to develop a little more." From there I asked whether I should attack one part or concentrate on this volute. Both areas were important, I said, but I probably should attack this section. A movement was going upward right there, and I thought it would be a good area.
"Let me fix a little bit." I knew it was kind of hard to see on the camera, and I apologized. "But please try." My need was a really good taper in that direction. As of then I kind of didn't like this section. It's not gradual movement. That line, by the way, was just a middle line of the movement.
After that came a verdict on the movement. "That is a little better." Not exactly the best, but much better. Now it just curves upward, and maybe a little more curve right there. I planned to develop this chunk. "Again, the idea is that you create a boat, like a fisher boat front."
How far did I want to take that spot?

"My question is, how developed I want to see this?" A second one followed: if that is my middle line, what do I really want showing in this area right here? "And that is a big question for me. I have to make the decision."
It was also a somewhat challenging area, and room to work with was short. Some kind of really nice movement was possible. But did I want to or not? Maybe I could just do acanthus growing from underneath of there. "That's exactly what I'm going to do."
Next I would establish the boundary. Please, I said, what you see is a concave on the inside, a transition pretty much to the ceiling. The camera would not show it exactly the way it is supposed to show. Just please understand. It's almost impossible, I said, and you will see that later.
Why did I pick an orange marker?

Time to think. Kind of like this is a middle line, and probably I would use just a marker. In this case orange could get that movement, my gradual movement from right here all the way to right there. "Yeah, it's not really flowing yet. It will."
Now I needed two more divisions. Probably one of them would start somewhere from here. For the other I was looking at the space, and I would take a little smaller space than from that point to this point. Again, only middle lines. Just the middle lines.

Next, "this section is going to be a flip above." It is just the overlapping part of this movement, and I think it will look really good. "So that's why I'm doing that section in orange." Another one would get a different color. For me that is not required, because I know exactly which part overlaps which. But just for you to understand, it overlaps this way, and I'll develop some stuff right there.
Where did the second boat come in?

Right after that: "Now, logic that's supposed to go underneath somewhere right there." Then came the line this page is about. "And again, another shape like a boat, I would say. And there's going to be another shape like a front of the boat, fisher's boat." And actually, now I could start creating more complicated movements.
A little higher right here was possible, I said, and I would create the circle. I usually don't do that, because I honestly know already what I'm doing. I don't have to, but approximately like a circle. It's a division, and there's a main division right there.
Those divisions would carry a middle line underneath, running to this middle line. That would be my main boundary. The main boundary. Later on I would develop a little more.
What did the thickness of the board have to do with it?

Then a decision waited: what I wanted right there, because everything depends on how deep I excavate the sides. My next words were that I would use a different color. One choice was flipping all the way like that, but I also had a challenge in how thick that board is. "So that's also a kind of little challenge."

The other choice was partial flipping, the middle line sitting right there, continuing on another side and heading this direction. Maybe that would be good, I said.
Part 2 begins on the same thought. I think it will be good, although challenging because, like I said, that is already a ceiling part, and I have to make sure that rounds and I have to excavate with deep. On the other hand, it would give me really beautiful shadow.
A few numbers sit later in the lesson. In part 2 I said number 11 and 12 millimeters (0.47 in) would make my outline, "so it's a half an inch." I was glad to have eight quarter material for the ceiling, almost two inches, "like one and 15/16" (49 mm), and about 50 millimeters (1.97 in), a little less. Part 3 has my plan for a plug cut with a number nine gouge, maybe even 20 millimeters (0.79 in), like three-quarter of an inch.
In which courses did I explain the boat?

In Carving Byzantine Acanthus lesson 7 I started with a reminder about the boat look of acanthus. The borders are still boat-like, then the middle, the sides and the divisions, and the main idea is still the boat. Turn it and twist it around and it stays one. So we really have to follow that idea, I said: establish the borders first, and then divide.
The end of the leaf needs a decision, high, in the middle or low, and that decides the middle line. "So we always start with the middle line." Later came "Fisher's boat shape." Looked at another way, I said, it's the same thing, just twists. Once you understand that idea, it is nothing more than a boat shape or leaf shape, and you can twist it as many times as you wish. Get the middle line in, establish the boat, and "just do whatever you want."

Furniture Panel design lesson 4 gives one of the ways to draw acanthus: establish a boat, the outside movement, "what I call it." Draw a boat-looking one and move it in any direction. "I'm not sure if it makes sense or not, but this is just my outside boundary."
Boundary is the word again in Byzantine Acanthus lesson 10. Everything is supposed to have one, I said, shaped like the boat or the leaf. I would put the first boundary and see that shape reach the edge, and later that section must go. Over in lesson 8, my words were "So establish the boat." Then: "I'm not sure if you like that comparison to boat, maybe just a leaf shape. Or some people don't know how the leaf looks."

Venice Room 19 adds a count. Every acanthus is supposed to be a boat, or just a leaf, or sometimes a fishing boat. That is the overall shape of it. After it come the main separations, at least three, and lots of times five.
A twisted version sits in the Principles of Design course, lesson 4. We have to establish the border, and I like to call it a boat shape or leaf shape. There it is a Fisher's Boat, but twisted one, and "it just goes this way, twisted boat."
How did the boat show up while I carved?

Workshop 22 shows me on acanthus separations, with the main structure in mind first and the subdivisions after it. The boat is how I call it, a fishing boat somewhere, though not completely. Its front part is this part. That movement needed a little fixing, and a little taken out from this side, probably with a bigger number 11, but with care not to touch that one. Sorry, I said, if you can't see.

Two more Venice Room lessons carry shorter mentions of the same boat. Workshop 25 has the main fishing boat shape, right there. Over in workshop 29 the fisher boat idea was not too nice right there, and I said maybe I have to chop a little bit this way and get rid of that, or create something below that movement that will make more sense.

A boat effect comes up in Furniture Panel lesson 19. I could probably attack this one right away, I said, and I was pretty sure number seven would do, maybe with a hit just like that. I put it as a fisher's boat effect, like concave inside. Maybe this side would be my high spot.

In Hashemi Flowers lesson 8 a leaf goes upward, and I said I have to create the overall main shape, "looking more like a boat." That shape is what I am talking about. My high point would sit somewhere really at the highest point. I said let me take a marker: all of that must go, so that is my main shape. "Hopefully, you understand what I mean by that." My plan next was a V tool, approaching carefully, really carefully, from this direction.

Petals get the same word in lesson 30. All round is not what I wanted, because those are petals, and petals have to resemble a boat. A true perfect round would not do, so I have to dig out some more areas on the inside.

Grape leaves come into it in the Grape Leaves vase course, lesson 2. Every main division will get three subdivisions. Then comes the front of a fisher's boat, drawn with a black marker so you see better on the camera. "So that is the point," I said, and the next two points got the same words. A notch is the plan for each division.

Two movements come into play in Venice Room 56, part 10. I think I'll just end up going right in the middle between them, and there I create a fisher boat's front. "Here's the front of the fisher boat. See if you're able to see that better." Then: "So it's always like that, my starting point for the development of foliage. It doesn't matter if it's acanthus leaf or not, even if it's grapes."

Space is the issue in Venice Room 74. I wanted to use as much as I could, right out to the edge, but if you remember the golden ratio, 62% or 60/40 would be easier, with 40% right here and 60% right there. "To be exact, it's a 62% and 38%." Then: "Let me establish a fisher's boat boundary, just like that." The outline of my leaf would follow it. Part 5 of that lesson uses the same name, with just the boundary and my middle movement.

One piece in Venice Room 77 looks almost like a single leaf. But yes, I do have a rib, but it's only a leaf folding like that, almost a boat. Small details and separations would come from that.

The same idea turns up in Venice Room 83, part 12. The logic I follow always, for all acanthus leaves or any leaves, is the shape of the main leaf, even with a division on the side: a normal one, the kind you see every day on almost all of the trees or plants. I can call it also a boat, a fisher's boat, and "that makes it much easier."
Is every boat in my lessons the same boat?
Venice Room 93, part 3, has a boat I drew as an example of the law of space, and I asked what size that boat is. What I mean by boat is just like a fisher's boat, whatever boat you have in mind. Can you tell from that picture how big it is? You really don't know until you place another object right beside it.
Which lesson gave me which line about the boat?
| Lesson I named | What I was doing there | My line |
|---|---|---|
| Byzantine 7 | Setting the borders, then the middle line, then the divisions | still a boat |
| Furniture Panel 4 | The outside boundary for an acanthus movement | you establish a boat |
| Venice 22 | The front part of one movement | a fishing boat somewhere, not completely |
| Hashemi 8 | A leaf that goes upward | my main shape, a boat |
| Hashemi 30 | Petals that cannot be a perfect round | petals have to resemble a boat |
| Grape Vase 2 | A notch in each of the divisions | the fisher's boat front |
| Venice 56 | A line between two movements | a fisher boat, even for grapes |
| Principles 4 | A border around the acanthus | a Fisher's Boat, but twisted one |
| Byzantine 10 | The first boundary of a leaf | everything has a boundary |
Where can you watch every lesson named on this page?
Each one sits inside a course of my wood carving school. The Venice Room Part 5 course holds workshops 50 to 61, and workshop 59 is the lesson for this page. Those boat lines come from the Byzantine Acanthus course, the Furniture Panel course, the Hashemi Flowers course, the Grape Leaves vase course and the Principles of Design course. If you want to see where to begin, start here.
How it's done
- Set the borders first. Borders go in first, I said in lesson 7 of the Byzantine course, and the divisions come after them.
- Find the middle line. Middle line in, boat established, then do whatever you want, I said.
- Color the overlap. Orange marked the section that flips above, and I planned a different color for another one.
- Decide before digging. The decision about what I want right there came before the digging, because the depth of the sides depends on it, I said.
- Weigh the board. The board's thickness was a challenge for a full flip. Partial flipping was the other choice.
- Check the boat. The fisher boat idea looked not too nice at one spot in Venice Room 29, and I said maybe I have to chop a little there.
Frequently asked questions
Which tool did I name for the outline in part 2?
A number 11, with 12 millimeters (0.47 in) said right beside it, for my outline. Half an inch was how I put it. Parts 2 and 3 carry the sizes, while part 1 has the marker colors and the boat picture.
What was the board challenge in part 1?
How deep I excavate the sides decides everything there. A full flip was one option, and the board's thickness was a challenge. Partial flipping was the other, and then I said maybe that is good.
Why was one section orange?
It marked a section that overlaps another, the one I called a flip above. A different color was planned for the next section. Marking is not required for me, because I know exactly what overlaps what, so the colors are for you.
What to carve next