

Alexander Grabovetskiy, woodcarver, School of Woodcarving · Published 2020
What does a wood carver mean by "support"?
Quick answer: Support is the word I said in Venice Room workshop 78, part 5, when I placed my fingers right underneath the leaf and it was still kind of moving around. Other lessons of mine use it for a stick, for cookies, for a wall left standing, for supporting grain and for a design.
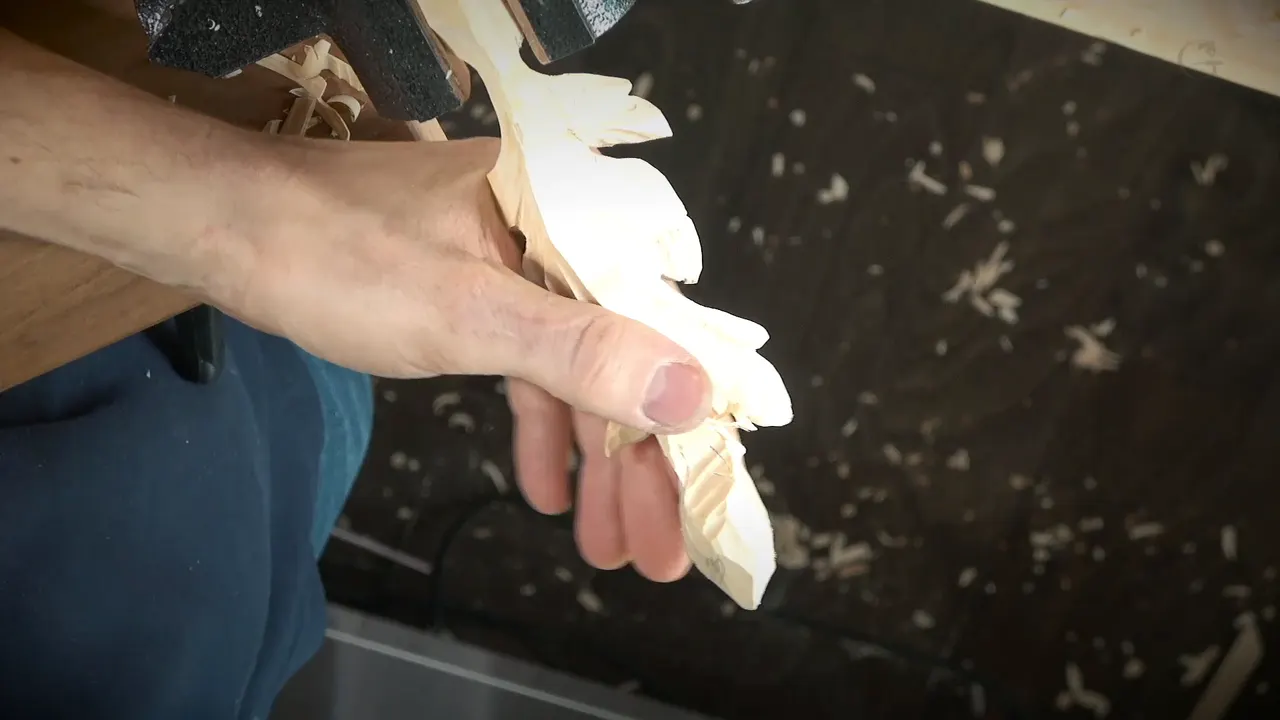

Support is the word I said in Venice Room workshop 78, part 5, about a leaf that was moving while my fingers were underneath it. My other lessons use it for a stick, for cookies, for a wall left standing, for the grain and for a design.
Ever held a thin leaf in one hand and felt it shake under the gouge? Does a piece slide on your bench just when you want it still? Those are the spots where I reach for this word, and the lines below are my own, lesson by lesson, with the course each one comes from.
What did I say about support in workshop 78?
In part 5 I said, "Not bad at all. Then I'm going to make subdivisions." They were to be just small notches. For the triangles I said probably a smaller number, nine or number eight, to relieve those triangles, one and then another. Then I'd create that separation cut, this one and that one. Everything, I said, would come to the edge from this side. It does not look too bad at all.

Cleaning with the knife, I said, would come first, and then I'd finalize it with some concaves, small ones, wherever I see a separation. "They don't have to be really deep. It's just for the shadow."
You can hear my granddaughter in the background, I said. She is almost two years old and was visiting that day. Well, almost every day right now, I added, with my apologies if it's bugging you.

Then I showed what I had and said, "Let me work on this on the final one." I kind of like the shape already, I said. "Let me kind of refine a little that." Maybe I'm not going to do too much to it, I said, except remove the backside of it. Then "let me use number seven," though I need to attack that from a different direction.
After that, I said, I would flip it upside down and remove whatever chunk I have on the backside. We are well on the way, I said, so it doesn't look too bad. It's a really interesting movement. That chunk has to be gone. I have to be really careful how I do it. I'd try along the grain, I said, to see whether it works or not. Of something else I said, "And this one, I don't really need at all."

Then came "Let me just try to get across the grain and see how it's going to work out." Here is where the word turned up: "And I'm placing my fingers right underneath to support, and it's still kind of moving around." The next line gave my reasons: it was along grain, and I had that handle. "I'm still pretty stable."

What goes under a part that moves?
A finger did, in Venice Room 77, part 3. A number 7 at 14 millimeters (about 0.55 in) is what I said I was using, and of course I need to be really mindful how I do it. Right underneath went my finger, to support, I said, because even with a quarter-by-quarter connection point the connection was still somewhat fragile.

The finger comes back in Lily box 11, part 7. Right then the piece was really fragile, I said, and my finger made the pushing point. "See that? It moves." It could break easily, I said, but the finger underneath made some kind of support.

Part 10 of the same lesson has another line. Really sharp tools are the key, I said, because even when I'm holding it by finger, it's almost impossible to create a solid support. A better idea for supporting it is welcome in the comments, I said. I have carved that type of tiny small stuff for a long time, and for myself at least I still couldn't find a better answer than the finger underneath, and then carving.

What else can sit under a piece?
A stick can. Lesson 14 of the Maine class on Grinling Gibbons, part 2, holds a case: I said maybe number 16, a small V tool, to walk down and make the relief cut. Then: "By the way, see how it moves. It's fragile." So I would need to put some support right underneath, I said, and any stick, any piece of wood will do. That's how I've done it, and that way it does not move as much.
A block comes up in Lily box 13, part 1. It's a good idea to have a support behind, I said, especially if you don't have a leg, as in my case: I did not keep the leg for those two pieces. You need to bump against something. You saw me before, I said, use just the clamp. Here it was just a white oak block, but it can be any block of wood, and that way it's a lot easier for me to stabilize it. Some wood carvers prefer to create a notch in a piece of wood and set the work inside it, which is more stable, not moving.

My bench has its own helpers. Workshop 79, part 1, shows them: I said I need to place my piece right on the bench, and I was using those cookies to hold it. "Super heavy," I said, so I wanted it flush with my workbench. I needed to position it the right way to get the support on this end. Knocking my lights was not a good idea, I said, since I've done it before. I also get a piece of plywood with the supporting shelf, which uses just small pins, so it is really easy to remove and reuse.

Workshop 79, part 2, carries a short one: "Somehow, I don't have anything to grab. This is not going to work, but it's okay." Earlier in the same video I had said that maybe I could clamp that also. Then came "Maybe I'll just support it with the cookie. It's going to hold it in place."
Venice Room 1, part 8, has another. My words were "let me pull my bench toward myself," and I would reposition my cookies, because right then one side was much heavier. I wanted a good support. Then: "That is good. And I can just continue to work."

Can a piece get too much support?
In my words in that same Lily box lesson, it can. "But be careful also, because you can create too much support." What I meant was that you can push from the opposite direction upwards and break it. When you push down with one side, you also tend to push backwards. Two points of pressure, I said, and it is still possible to break.
When do I leave wood standing as a support?
See Hashemi lesson 14, part 8. "Now, this wall also has to be gone," I said. I would use the same number seven we used before and remove some of it, not completely yet, because I still have to work on this part and I need some type of support yet. Where I can see the picture, preliminary, I can do that. Just not all the way yet.

That lesson's part 4 says it again. It will be much easier to attack that from opposite side, I said, and I'll have a chance yet to work from there. When I get to this one, I still would like to maintain support, at least for now. Later on I'll flip it, and it will be a lot easier to reach that chunk of wood and remove it. But for now, I said, I am happy with what I see.
Over in Hashemi lesson 10, part 1, I said I need to lower down one section because I need to create a support point somewhere. Then: I don't really need it because it's thick enough, and if it will be gone anyway, I should be fine. In Lily box 13, part 1, one part will go downhill, I said, but I won't take it down fully yet, since I need support of some kind. I can always make a final form later.

A plan sits in Venice Room 65, part 1. I could attach one point to the leaf, and maybe I should, because it will still look beautiful and maybe there will be an extra support point. Or I could go right through and create some opening between this side and the inner side. "But should I? That's the question."
What does a piece with plenty of support let me do?
Hashemi lesson 15, part 3: I said I don't want to force it, although I could, because I do have a support now. I can actually make a straight cut down like this. In lesson 22, part 1, the setup has no support on the bottom, so be careful, I said. Do not press too hard, since you can easily break it. Just make multiple cuts, and it's much safer, I said.

The thick side of it shows in Furniture Panel lesson 19, part 2. Ask me why I left the thicker areas, I said, why I didn't take everything deeper to one-eighth of an inch (3.2 mm), and the reason is to give that panel some strength. A lot more material removed means a lot less support. I'd still like to see the thicker parts, like supporting parts. One part is connected right across and pretty much really thick, with the high spots, and this side is also supporting pretty much all the way.

There are other solutions too, I said, from different generations. You can see them sometimes in furniture design. On the backside they would create channels, like a dovetail channel on both sides, and insert a second piece the other way, so the grain would run across. That would support the panel, and then they would plane it to the same height.
Byzantine acanthus lesson 9, part 3, answers a viewer's question about why the piece was left thick at the beginning. I knew we would bang from the top, I said, and we needed that support. Without anything supporting underneath, that would be a big problem. Later I repeated it: we needed that support for future projects. Even a really light and airy piece, I said, needs support if you want to bang with the mallet.
What is supporting grain?
The techniques lesson Carving with the grain asks it straight: "is that supported grain or not supported grain?" Look at the grain itself, I said: that is the upper part, and below is a supporting grain. It actually holds that upper part. Then that is even longer, and it supports the upper part of the grain. Start carving from that part, I said, and there's no supporting grain, and the grain will just rise up. "They're going to fight."
The butterfly plate course says it in lesson 2, part 1: you really need to get support underneath with the cut when you carve, so supporting grain will be underneath. The Tray of Blessing, lesson 6, part 2, has a short one: I really have to start from this point, I said, if I want to carve with supporting grain.

Venice Room 95, part 3, gives the cost. A super deep undercut was out in that case, I said, first because that side would be the back side, not visible. Second, if I undercut, some of the grain is not supported anymore, and then it will not hold. A little is okay, but not much. I still have to create the support for the grain.
In workshop 100, part 3, my cut went against the grain, I said, raising up the grain so there was no supporting grain, at least on the left side of my tool. I was supposed to attack from that side but could not, because I had that leaf in the way. The same comes up in Venice Room 151, part 1, where I stayed a little away from the cut. It was choppy on that side and cleaner on the other. A plan sits in Venice Room 112, part 3: I could create an open spot underneath, and maybe I should, since it's a supported grain, so I shouldn't have any problem.
Does support mean something in a design?
It does in my design courses. Principles of Design, law of space, part 2: when you look at the world, I said, there's nothing like a house and nothing beside the house. "There's something supports the house." Later in that part I asked what the main idea is and how you want to support it. In church, I said, there is one main idea and three points around it to support that main idea. Four points would be much better than three, I said, based on a golden ratio.
Another design lesson, the law of arabesque, part 2, has me ask whether my letter S should go on this side or that. I said that the letter S supports the main movement, and then I asked why we do that letter S. To support the big idea.
What happens with no support at all?
Over in Venice Room 84, part 4, I said I felt almost like I was air carving. Then: "it's just like there is airbrushing. There is no support, and I have just been chipping away little by little."
In Roman acanthus lesson 16, part 5, I asked viewers to keep an eye on what I did with my hand: placing it as close as possible to the edge of the tool. "Also, I'm always placing this part on some support, so that way, I can control much better."

Where did I say support, in one table?
| Where | What I said about it | Which kind of support it was |
|---|---|---|
| This leaf | Fingers under the leaf, though it kept moving | A hand |
| Venice 77 | Finger underneath, since the connection was still somewhat fragile | Finger |
| Lily 11 | Placing the finger underneath makes support of a sort | Pushing point |
| Maine class 14 | A stick put right underneath a fragile part | Any stick |
| Olives lesson 13 | Something to bump against, such as a block of wood | A block |
| Lesson 79 | The piece placed on the bench and held by cookies | Cookies |
| Hashemi 14 | A wall not removed completely yet, since I need support yet | Standing wood |
| Furniture 19 | The thicker parts, like supporting parts | Thick areas |
| Venice 95 | A grain that is not supported anymore will not hold | The grain |
| Design 3 | How you want to support the main idea | The design |
One word, and a different job in each row.
Which lessons can you watch?
The leaf lesson is Venice Room 78, and Venice Room Part 7 holds workshops 74 through 85. Each lesson above has its own page, linked where I named it, and each opens with school access. A plain workshop number means the Venice Room. The support changed with the piece: a stick, cookies, a block, the grain. A vise held the leaf in workshop 78.
Do you want to see a chisel work on a leaf that is held right? Looking for carving lessons that show the hand under the wood? Start here.
How it's done
- Put your fingers underneath. Workshop 78 has my fingers placed to support the leaf while it still moved around.
- Put a stick under a fragile part. The Maine class says any stick will do, set right underneath.
- Hold a heavy piece on cookies. Workshop 79 has the piece placed on the bench and held with cookies.
- Keep a wall for now. Hashemi 14 has me say I would take part of a wall away, not completely yet.
- Pick a starting point by the grain. The Tray of Blessing has me say I really have to start from one point if I want to carve with supporting grain.
- Watch the push from below. A warning from the Lily box lessons: a push upwards can break the piece.
Frequently asked questions
How did I support the leaf in workshop 78?
My fingers went right underneath to support it, I said, in part 5 of workshop 78. I was still pretty stable, just because it was along grain and I had that handle.
Is a finger enough support for a fragile part?
In lesson 11 of the Lily box course, part 10, I said that even holding a piece by finger, it's almost impossible to create a solid support. For myself I had not found a better answer than the finger underneath, and I asked for ideas.
Is there a limit to how much support helps?
Part 7 of Lily box lesson 11 warns about it: pushing from opposite direction upwards can break the piece, and pushing down with one side while pushing backwards makes two points of pressure.
What to carve next