

Alexander Grabovetskiy, woodcarver, School of Woodcarving · Published 2024
How do you carve a vine that hides under another vine?
Quick answer: A hidden lower vine is a second strand carved under the main one, in wood you dig and drill out, so it shows only when you look close. On my grape onlay I took out about an inch, went right through with small gouges, and kept at least three eighths of an inch (about 9.5 mm) of wood for it.
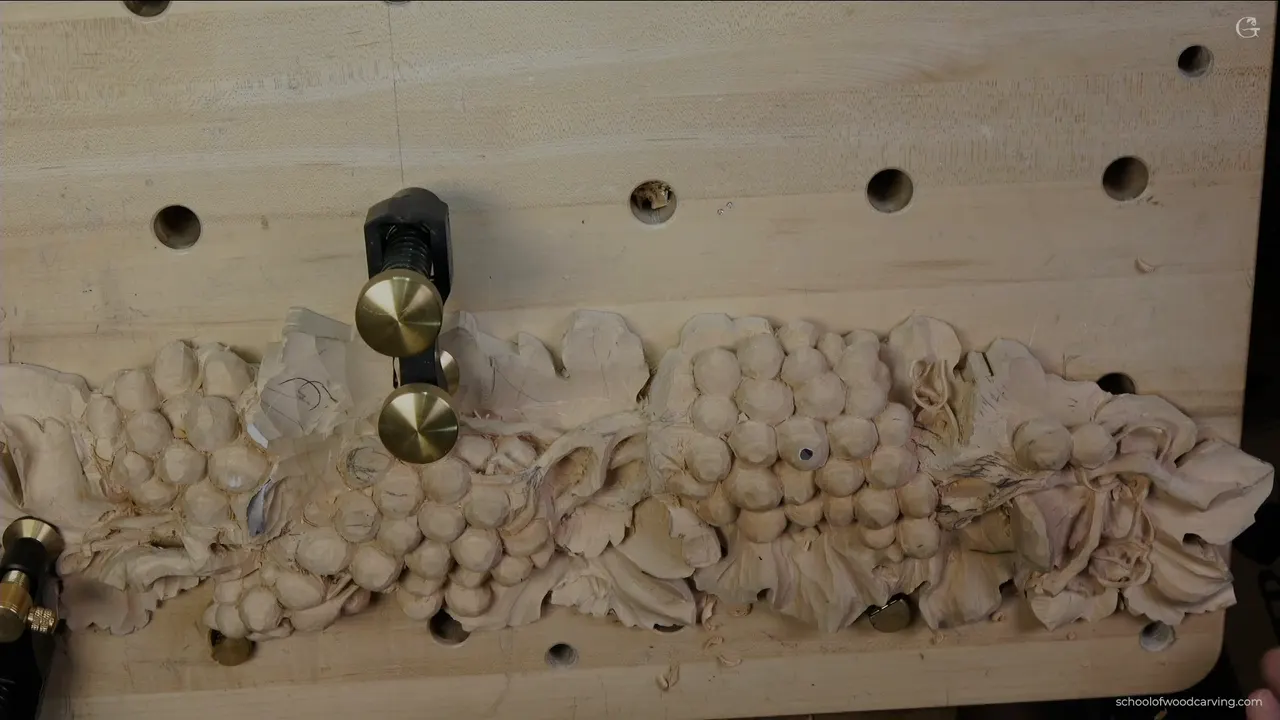
A vine hidden under another vine is a second, lower strand that runs beneath the main one and goes out of sight somewhere. On my grape panel I wanted one more of those under the big vine. Carving vines in wood like that means working in layers, and in the first video of lesson 7 I made room for it, drilled right through, and set the lower one in.
Have you ever watched a vine on a fence slip behind a post? Did your eye keep looking for the spot where it comes back out? A carved vine pulls the eye the same way. It just takes a lot of digging first. This is part one of lesson 7 in my grape onlay course, and below is what I did there, in my order, with what a few other carvings of mine say about hiding a part.

The hidden vine on my panel, in six lines
- I said I'd probably stick one more vine beneath the main one, so the panel would have multiple layers and look full 3D.
- The wood in that section came out first.
- Small gouges then drilled right through.
- Logically the lower vine had to hide somewhere, and I left that for a little later.
- Wood was short there, so I kept checking what was left.
- A small number 11 outlined the second movement and reached right underneath it, and then came a slight undercut and a little rounding on its back edge.
Why carve a vine that hardly shows?
Depth is the reason. At the start of the video I said I wanted to continue on this big movement, the same idea as in another spot I pointed to, multiple layers, and now right here too. You can see it should be really, really full three dimensional.
Right now, I said, I see that vine divided only in two. I would probably stick one more, and one of those movements would go right underneath, somewhere that way. Full 3D, in my words on camera.

You really don't see that lower movement well, as I told you in the video, but once you get really close it's detectable.
There is a plain reason that works on the eye. When one object partly blocks another, people read the blocking one as closer, a cue the depth perception page calls interposition. Painters have played light against dark for centuries under the name chiaroscuro, and a carving does the same thing with real shadow.
Where does a hidden vine go?
To a place that makes sense. Partway through the first video I looked at a part going right underneath and said I wanted to make sure, logically, that it's hiding somewhere. I'd do that a little later, I said, and went back to taking out the excess.

The same question came up on my Cabernet tray, in lesson 6. We had a second stem there. I was about to start establishing it, going to a point I showed, and I said it's going to be hidden. What I was after was only a partial illusion. Most of that stem would be gone, and all I'd keep is a little small bit of it sticking out, because in nature it goes to the second leaf, and the second leaf sat right there. Undercutting under the lifts came next, I said, keeping about an eighth of an inch (roughly 3 mm) for now, because I can always clean that later. I didn't want to overdo it yet.
Grapevines are climbers that hold on with tendrils, as the botany pages on the Vitis genus and on tendrils explain. So even a hidden stem has a place it is going, like that second leaf on the tray.
What comes first when carving vines in wood that go underneath?
Digging, and then drilling. Step number one was to excavate this section and take out most of the material. After that I had to drill right through without breaking anything.

A number 11, four millimeters (about 5/32 inch), took the first wood out. A plug cut would probably have been enough there too, but I thought I could manage without it. At about half an inch (about 13 mm) down I said that is enough, and went in from one side, the one more convenient for me, with my flute at about two and a half o'clock.
I wanted to be sure the thickness stayed right there, because that part matters. The piece kept moving on me, too, so I had to tighten it a little more. I'd opened the video with an apology for the mess behind me. I was finishing one of my other projects and had just run out of space.

Then a number 7 at 14 millimeters, a little bigger than a half inch, took off the excess next. I have almost two inches (about 5 cm) of wood here, and there's no reason to keep some of the spots too high. It still looks full 3D. I didn't worry about the leaves yet, since they only had a preliminary shape.
Next I went deeper by about the same again. Half an inch from that spot I keep for the body, and below it there's about another half inch. That gave me one inch (about 25 mm) from there down.

The drilling came next, with a gouge only an eighth inch wide (3.2 mm). I went at the same hole from the left and from the right, then from above again, to hit whatever was right below. I could have kept drilling from there, but logically a back bend gouge took out some of the material next, and if you don't have one, you just continue to drill. Once I was through, it was just a matter of cleaning up.
Here is the whole first video, stage by stage, with the depths I gave as I went.
| Stage | Work | Measure |
|---|---|---|
| The plan | add one more movement right underneath it | for multiple layers there |
| First digging | dug out the bulk of that section | one inch (25.4 mm) |
| Drilling through | small gouges from left, right and above | until I was through |
| Wood check | almost a quarter inch (6.4 mm) inside | 3/8 inch (9.5 mm) |
| Lower outline | 2.5 mm (0.1 in) number 11, underneath | my preferred outlining method |
| Depth left | six millimeters (0.24 in) below the high spot | plus 3 mm (0.12 in) |
| Lower vine | three eighths wide (under 1 cm), slightly undercut | same idea, other side |
| Back edge | a number 7 back bend rounded it | not too roundy, though |

How much wood does the lower vine need?
At least three eighths of an inch (roughly 10 mm), in my case. I gave that figure midway through the second movement.
Material was the biggest challenge in that section, because I already had some excavation there. A quarter inch (6.4 mm) would almost fit on the inside, so hopefully it would be good. If it's not, I said, I can always just clean this out.

As I went down I kept an eye on how deep I was getting, because there wasn't too much material left. At one point I had about six millimeters (about 1/4 inch) from the high spot down, and I figured I could go about three more millimeters (about 0.12 inch) or so.
Wood ran short in other hidden spots too. In the Maine class, lesson 12, carving in the style of Grinling Gibbons, I set a flower to be hidden underneath a parsley leaf. There too I had to be mindful how much material I had, and I really didn't have much. When I started undercutting I couldn't undercut too much, since I didn't really have the thickness underneath, just about a millimeter (about 0.04 inch) deep.
On the Hashemi flowers, lesson 8, I wanted a leaf to look like it goes in and then turns back. The spot was fragile. Less than an eighth of an inch (3 mm) was left there, about 3/32 (2.4 mm), so I couldn't dig too much, and it went little by little without forcing.

Which gouge reaches under the main vine?
A small number 11 did it for me. First a flatter, smaller gouge came out, a number 4 at about a quarter inch (about 6 mm). For the outlining I chose a different tool, a number 11 at 2.5 millimeters (about 3/32 inch). That is my preferred method. With the same tool I could get right underneath.
A stabbing cut with some kind of flat gouge was the other option there. It's doable. I'm not the biggest fan, though, because you're just spreading the fibers to the sides, so I prefer the number 11, and sometimes the other way is all right.

I know it's almost impossible to see on camera. Look at the hole and you can follow the movement of my tool, because I can't get my camera inside. In that spot, two and a half millimeters worked wonderfully.
Earlier in the same video, drilling with the eighth inch gouge, I gave my reason for going small. There was some stuff on my way, and a small gouge lets me go higher or lower without damaging it. A bigger one would limit me, and I could take out too much material.
What finishes the lower vine once you are through?
A slight undercut, then a little rounding. I had three eighths wide there (just under 1 cm), and I wanted to undercut slightly too. You could see it going right through.

Then I excavated the other side of that movement, the same idea, about the same width, though it could be a little thinner there, maybe a quarter inch (roughly 6 mm) or so.

Last, my back bend came back out, a number 7, to round that back edge. I don't want it too roundy, but a little bit is right.

How do my other carvings hide a part underneath?
The same trick turns up in several other courses. The vase with grape leaves, lesson 2, had a stem that was supposed to go to a point we know is a golden ratio point. I wanted it raised, as if it rides above the leaf and then drops in. Two concave passes along its sides did that, with a 3 mm (about 1/8 inch) number 11 veiner, one side first and then the other, about 1/16 of an inch (about 1.6 mm) deep. After that I said I'd make the leaf sections look like they go underneath, closer to the stem.
In the Venice Room, lesson 46, I planned a concave that would run all the way and die somewhere on the inside, leaving only about five millimeters (about 3/16 inch), though it didn't have to be five everywhere. In one spot it would be only 1/8 inch (about 3 mm), and that part would disappear underneath.
Two lessons later, in Venice Room 48, a plug cut with a number 9 opened a hole. All of my other passes could go over it and disappear somewhere on the inside, from all of the sides, down to that hole. Not everyone does it like that. I really like the idea of extreme shadows, and without that hole I would not have that deep shadow, so it's not going to be as three-dimensional. You don't see the shadow with all the lights on. Turn one of them off, I said, and you'll see how deep it goes.

And on my furniture panel, lesson 21, among the acanthus movements, I needed a second line that would go almost all the way, or disappear somewhere. We'll see, I said, and I needed the pencil again to establish that line.
What if the vine breaks while you dig under it?
You glue it and carve it again. Before this video a section there broke on me, and I lost it. A new piece went in with hide glue, which I like there because it blends easier, and then I carved it again. Look close and you can still find a couple of spots. It happens sometimes, and I wasn't too careful.
The onlay is a pierced relief, so a thin part can go. My lesson 6 has a vine I could only reach from one side, in carving through the onlay, and a tendril knot that crosses over and under sits in lesson 4. The leaves come back in lesson 8.

Have you ever looked at a carving and wanted it to feel deeper than the board is thick? A vine you can only half see is one way I get that. All three videos of lesson 7 are in the course, and Access to the school opens every one of them. You can watch this whole wood carving panel grow, one lesson at a time.
How it's done
- Plan the extra layer. I picked a spot where one more vine could run right below the main one.
- Take out most of the wood. I went down a half inch (13 mm), then about that much again, which left me one inch (25 mm) below that point.
- Drill until you are through. My eighth inch gouge (3.2 mm) went in from both sides and from above until the hole opened.
- Check what is left. I needed no less than 3/8 inch (close to 10 mm) of material for the lower movement.
- Outline and reach under. A 2.5 mm (0.1 inch) number 11 did the outlining, then went right underneath.
- Undercut and round. A slight undercut, the other side the same idea, and a back bend rounded the back edge a little.
Frequently asked questions
Can you see a hidden vine from the front?
Only a little, and only when you lean in. The lower movement on my grape panel is hard to see, but once you get really close it's detectable. The Cabernet tray got even less, a small bit of the second stem sticking out and most of it gone.
Do you draw a hidden vine before you carve it?
For my furniture panel I did. The second line there would nearly run its full length or disappear somewhere, and I took the pencil again to set it. On the onlay itself I said the lower one would go somewhere that way, under the big vine, and then dug.
Should a hidden vine be perfectly round?
Round, but only a bit. Once my lower movement was through, a number 7 back bend came back out to round its back edge. I said I didn't want it too roundy, just a little bit, and for that spot a little was right.
What to carve next